tp
Developer Guide for Budget Buddy
Table of Contents
1. Introduction
2. Setting up
2.1 Prerequisites
3. Design
3.1 Architecture
3.2 Parser Class
3.3 Ui Class
3.4 CommandCreator
3.5 CommandClass
3.6 Storage Class
3.7 Commons
3.7.1 Transaction
3.7.2 Expense
3.7.3 ExpenseList
3.7.4 Saving
3.7.5 SavingList
3.7.6 RecurringExpenseList
3.7.7 RecurringExpensesList
3.7.8 DefaultCurrency
3.7.9 CurrencyConverter
4. Implementation
4.1 Menu Feature
4.2 Add Expenses Feature
4.3 Add Savings Feature
4.4 Add Split Expenses Feature
4.5 Edit Savings Feature
4.6 Edit Expenses Feature
4.7 Reduce Savings Feature
4.8 Delete Expenses Feature
4.9 List Savings Feature
4.10 List Expenses Feature
4.11 Check Splitted Expenses Feature
4.12 Settle Splitted Expenses Feature
4.13 Find Expenses Feature
4.14 Recurring Expenses Feature
4.15 Currency Converter Feature
4.16 Setting Budget Feature
4.17 Get Graphical Insights for expenses
4.18 Get Graphical Insights for savings
5. Documentation
6. Testing
Appendix A: Product Scope
Appendix B: User Stories
Appendix C: Use Cases
Appendix D: Non-Functional Requirements
Appendix E: Glossary
Appendix F: Instructions for Manual Testing
Acknowledgements
Diagrams have been created on Draw.io.
Design & implementation
1. Introduction
Welcome to the Developer Guide for BudgetBuddy! This guide has been created to help you current and future developers of BudgetBuddy understand how BudgetBuddy works and aid you in easily adding new features and fixing bugs. In this guide, it will go over the main parts of the app, how they work together, and why we made them that way.
2. Setup Guide
This section describes how to set up the coding environment, along with the tools needed to work on BudgetBuddy
2.1. Prerequisites
- JDK 11
- IntelliJ IDEA
3.Design
3.1 Architecture
The following diagram provides a rough overview of how BudgetBuddy is built
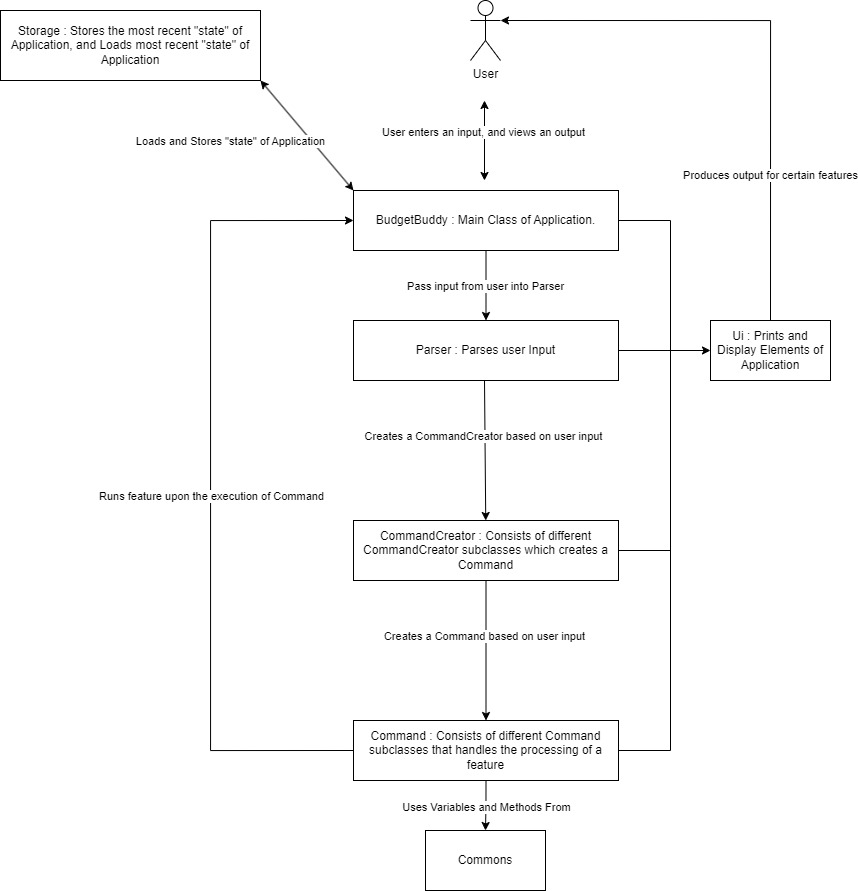
BudgetBuddy is the main class of the application and directly interacts with the user. BudgetBuddy
passes along the input into the Parser. The Parser creates a CommandCreator object depending on the user’s input
. The CommandCreator object then creates the Command object.
This Command object will be executed in BudgetBuddy. The Command object
utilizes methods and the classes present in Commons, which will be explained in more
detail in the following sections.
3.2 Parser Class
The main functionality of the Parser Class is to determine the type of CommandCreator object to create. Using
Boolean Functions, the Parser Class determines this by what the user input starts with.
After determining the type of CommandCreator object, the Parser initializes the CommandCreator object
with all its required parameters.
Here are some examples :
| Boolean Method | Checks if input starts with | Feature Requires | Creates |
|---|---|---|---|
| isAddExpenseCommand() | add expense | input, ExpenseList | AddExpenseCommandCreator(input, expenses) |
| isEditSavingCommand() | edit expense | input, SavingList | EditSavingsCommandCreator(input, savings) |
3.3 Ui Class
The Ui Class is used to print certain elements to the CLI. In particular, it consists of the Welcome Message, Goodbye Message, Divider Lines and all the corresponding commands’ command format.
3.4 CommandCreator Class
The CommandCreator class has multiple subclasses, which corresponds to a specific function of the application.
Within the CommandCreator classes, it handles making sense of the user input, obtaining the relevant parameters, and finally
creating the Command class to be executed.
The superclass CommandCreator is an abstract class which is never instantiated. Where its createCommand()
method is overridden by its subclasses.
The association between the Command and CommandCreator can be seen in their names. E.g. MenuCommandCreator, would
create a MenuCommand class when its createCommand() method is called. Similarly, FindExpensesCommandCreator would
create a FindCommand class when its createCommand() method is called.
For clarity, unlike the BudgetBuddy and Parser class, where only one instance of them is used for the entire
application, a new CommandCreator subclass is instantiated every time a user provides an input. Hence,
a created CommandCreator will always be specific to, and only handle one user input. This will be further illustrated in the
UML Sequence Diagram provided in section 3.4 Command Class
3.5 Command Class
The Command class, similar to the CommandCreator class, contains multiple subclasses, all corresponding to a specific
function/feature of the application. Stated in section3.4 CommandCreator Class
, each subclass of the Command Object is created by its associated CommandCreator subclass.
The superclass Command is an abstract class which is never instantiated. Where its execute() method is overridden
by its subclasses. What each Command subclass does when its execute() method is called would be discussed in
more detail in the Implementation section.
For clarity, similar to the CommandCreator class, a new Command subclass is instantiated every time a
user provides an input. As such, a created Command will always be specific to, and only handle one user input.
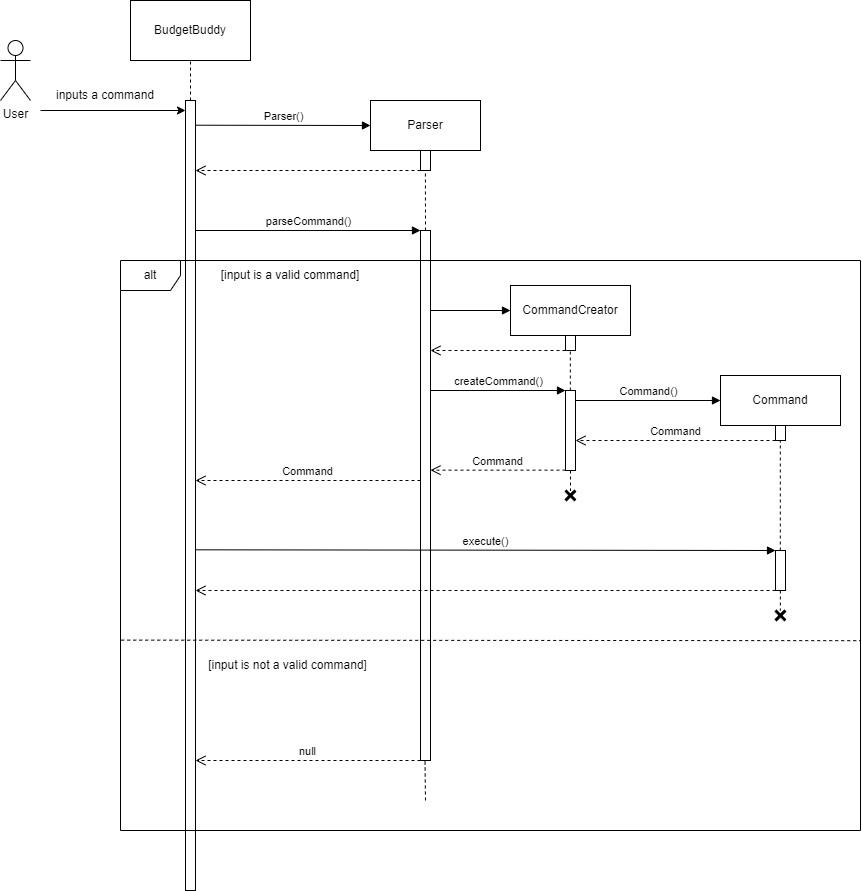
The following UML Sequence Diagram depicts the process of what happens when a user input is passed through the application, up till the point when the command gets executed :
Note : BudgetBuddy instantiates other classes such as the Storage and Ui class, however, these steps have been left out as they have no relevance to the process of creating and executing a Command.
3.6 Storage Class
The Storage Class handles the loading and saving of the features in BudgetBuddy. Different features are saved in different files corresponding to their data type.
The Storing methods are always called after every user input, ensuring that the saved files
are always up-to-date.
Similarly, the Loading methods present in the Storage Class is always called before the application is fully initialized.
3.7 Commons
The classes present in this group of Commons refers to a collection of classes used by multiple other components
. They represent data of the user’s financial transactions, including expenses and savings, along with methods
for organizing and managing this data.
3.7.1 Transaction
This is an abstract class, which is the superclass for both the Expense and Saving Classes. It contains common variables such as Currency, Category and Amount.
3.7.2 Expense
This class holds details regarding an expense a user has. Within this class, it has 4 class-level variables :
String category, LocalDate dateAdded , String description and Double amount.
String category : This variable holds the category of the expense. It represents the type or classification
of the expense as per the pre-defined categories (“Housing”, “Groceries”, “Utility”, “Transport”, “Entertainment”).
LocalDate dateAdded : This variable holds the date when the expense was added or recorded.
It is of type LocalDate, representing a date without a time zone.
Storing the date of the expense allows users to track when each expense occurred,
facilitating budget management and analysis over time.
String description : This variable holds a description of the expense.
It provides additional details or information about the expense,
such as what the expense was for or any relevant notes.
Descriptions help users understand the context or purpose of each expense entry.
Double amount : This variable holds the monetary amount of the expense.
It represents the cost or value of the expense, typically in the currency used by the user.
Storing the amount allows users to track how much money was spent on each expense,
aiding in budgeting and financial planning.
3.7.3 ExpenseList
This class represents a list of expenses. Within this class, it has 2 class-level variables :
ArrayList<Expense> expenses and ArrayList<String> categories, The variables and there relevance are as follows :
ArrayList<Expense> expenses : This variable holds a list of Expense objects.
Each Expense object represents an expense incurred by the user. The list stores all the expenses entered by the user.
Managing expenses in a list allows for easy retrieval, modification, and deletion of individual expenses.
Additionally, it enables functionalities such as filtering, listing, and calculating total expenses.
ArrayList<String> categories : This variable holds a list of predefined expense categories.
Each category represents a classification or grouping for expenses, such as “Housing,” “Groceries,” “Utility,” etc.
The list provides predefined options for users to select when adding or editing expenses.
It helps organize expenses into meaningful groups,
allowing users to track and analyze their spending habits across different expense categories.
This class also contains the methods to handle any user interactions with the list of expenses. These methods would
be further explained in their corresponding Implementation sections.
3.7.4 Saving
This class holds details regarding a saving a user has. Within this class, it has 3 class-level variables :
String category, LocalDate dateAdded, Double amount. The variables and their relevance
are as follows :
String Category : This variable holds the category of the saving.
Similar to expenses, savings can also be categorized based on their purpose or intended use.
Pre-defined categories include (“Salary”, “Investments”, “Gifts”, or “Others”).
Categorizing savings helps users allocate funds for different financial goals and track progress towards those goals.
LocalDate dateAdded : This variable holds the date when the saving was added or recorded.
As with expenses, tracking the date of each saving allows users to monitor their saving habits over time.
It provides a historical record of when savings were initiated,
helping users understand their saving patterns and behaviors.
Double amount : This variable holds the monetary amount of the saving.
It represents the value or sum of money saved by the user.
The amount indicates how much money has been set aside or accumulated towards achieving a particular financial goal.
Users can track their progress towards savings targets and
monitor their overall financial health based on the amount saved.
3.7.5 SavingList
This class represents a list of savings. Within this class, it has 2 class-level variables :
ArrayList<Saving> savings and ArrayList<String> categories, The variables and there relevance are as follows :
ArrayList<Saving> savings: This variable holds a list of Saving objects,
where each object represents a saving made by the user. The list stores all the savings entered by the user.
Managing savings in a list allows for easy retrieval, modification, and reduction of individual savings.
Additionally, it enables functionalities such as listing savings, calculating remaining savings after
deducting expenses, and adding new savings.
ArrayList<String> categories: This variable holds a list of predefined saving categories.
Each category represents a classification or grouping for savings, such as “Salary,” “Investments,” “Gifts,” etc.
The list provides predefined options for users to select when adding or editing savings.
It helps organize savings into meaningful groups, allowing users to track and
manage their savings across different categories.
This class also contains the methods to handle any user interactions with the list of savings. These methods would
be further explained in their corresponding Implementation sections.
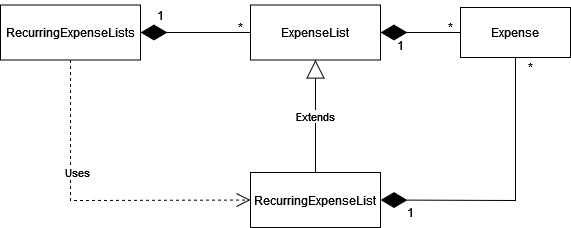
3.7.6 RecurringExpenseList
This class represents a list of recurring expenses for the Recurring Expense feature. Within this class, it has
1 class-level variable : String name. Which is used to store the name of the list. Given that its overall
functionality is similar to ExpenseList class, it inherits the ExpenseList class.
3.7.7 RecurringExpenseLists
This class represents the list of all lists of recurring expenses for the Recurring Expense feature. Within this class,
it has only 1 class-level variable : ArrayList<ExpenseList> recurringExpenses. Which is used to store a list of
ExpenseList objects. This class contains all methods required for the overall Recurring Expense feature to work.
The implementation of these methods would be discussed in further detail in the Implementation section.
For clarity, the following Class Diagram depicts the associations between RecurringExpenseLists, RecurringExpenseList and ExpenseList.
3.7.8 DefaultCurrency
The DefaultCurrency class manages the application’s default currency setting. It contains a static variable:
Currency defaultCurrency: Holds the current default currency setting, initialized to the Singapore Dollar (SGD) using theCurrency.getInstance("SGD")method.
This class provides two static methods that are further explained in detail in the Implementation section.
This class ensures a consistent default currency is used throughout the application, essential for functions like displaying amounts and performing currency conversions.
3.7.9 CurrencyConverter
The CurrencyConverter class provides functionality for converting amounts between different currencies. It includes two class-level variables:
Map<Currency, Double> exchangeRates: This variable represents a map where the keys are instances of
the Currency class, and the values are conversion rates as Double values.
The map stores exchange rates for various currencies relative to a base currency (in this case, Singapore Dollar, SGD).
The exchange rates are initialized with default values for common currencies such as
USD, EUR, JPY, KRW, MYR, CNY, and HKD.
The class includes several methods to handle currency conversion tasks, with its relevance explained in the Implementation section.
These methods facilitate currency conversion tasks by handling the conversion logic, validating input parameters, and logging relevant messages. They provide essential functionality for managing expenses and savings in different currencies within the budget management application.
4. Implementation
4.1 Menu Feature
The menu feature is designed to allow users to view the relevant command formats by inputting the relevant menu
indexes. This feature is orchestrated by the MenuCommand class, which is initialized by the MenuCommandCreator
class. Which is in turn, created by the Parser class. Within the MenuCommand object, the
MenuCommandCreator would initialize one class-level variable index of type String. The relevance of
this class-level variable in MenuCommand is as follows
| Variable Name | Variable Type | Relevance |
|---|---|---|
| index | int | Refers to the corresponding item in the displayed menu |
For Clarity, the menu items and their corresponding indexes are as follows :
| index | Menu Item |
|---|---|
| Empty/0 | Displays all Menu Items |
| 1 | Manage Expenses |
| 2 | Manage Savings |
| 3 | View Expenses |
| 4 | View Savings |
| 5 | Find Expenses |
| 6 | Split Expenses |
| 7 | Manage Recurring Bills |
| 8 | Change Currency |
| 9 | Manage Budget |
| 10 | Get Graphical Insights |
Upon the call of the execute() method in BudgetBuddy using command.execute(), the MenuCommand object
utilizes methods from the UI class to display the relevant menu items. The utilized methods are as follows :
| methodName | Return Type | Relevance |
|---|---|---|
| showMenuTitles() | void | Prints all Menu Items |
| showMenuItem(INDEX) | void | Prints commands associated at INDEX |
Important Note : As the process of how the CommandCreator is created upon the receipt of a user input has already been
discussed in 3.4 CommandClass, the following Sequence Diagrams would omit the initial methods prior to the
MenuCommandCreator being created.
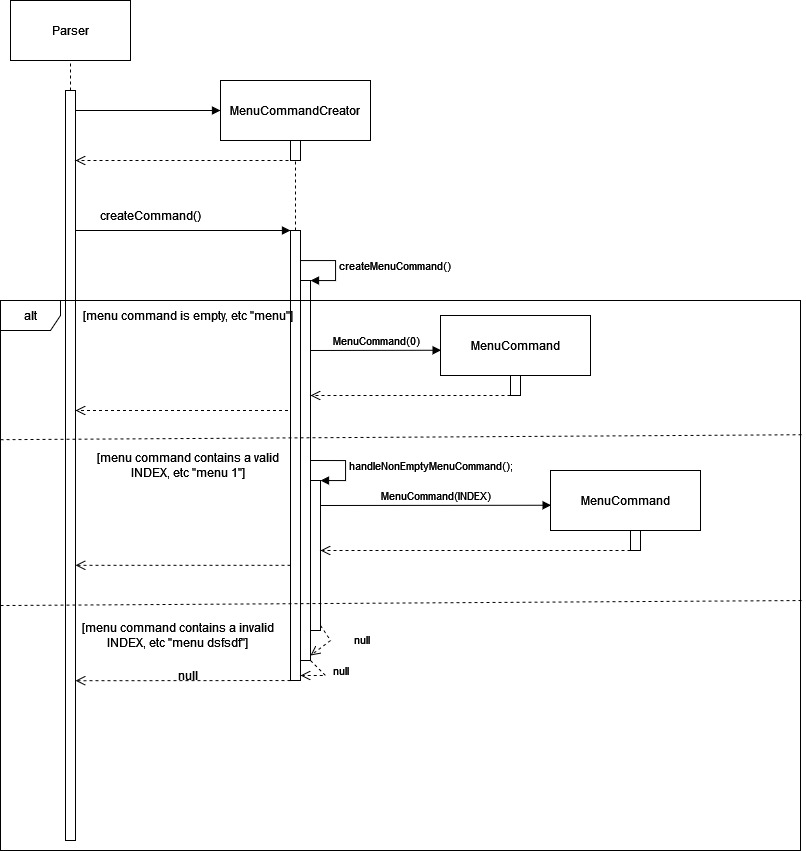
The following UML Sequence Diagram shows how the MenuCommandCreator for Menu Commands work and what
will be returned to the Parser, which will ultimately be returned to BudgetBuddy. Note that this diagram assumes that Parser
has already detected that the user input is a menu command and has initialized a MenuCommandCreator object:
The following UML Sequence Diagram shows the processes of the MenuCommand upon the call of its execute() command:
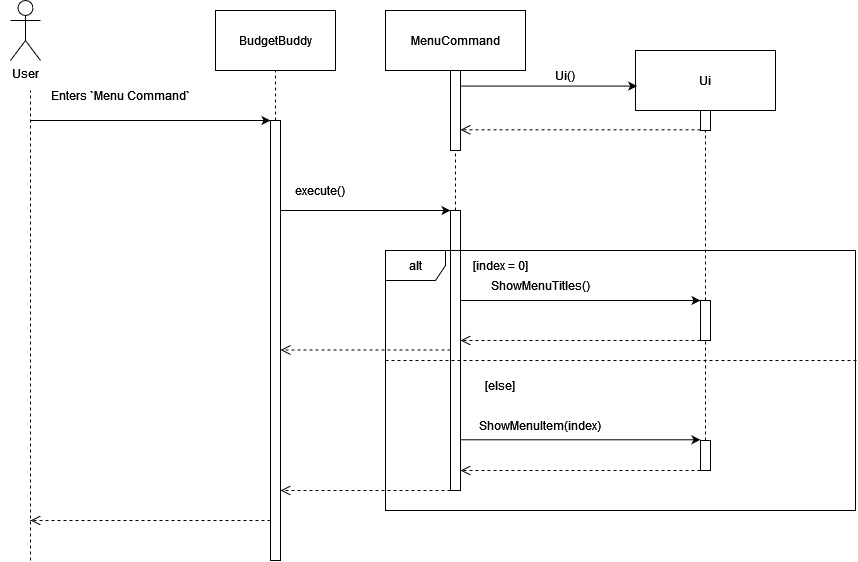
Given below is an example usage scenario and how the full Menu feature works :
- The user types
menu 1. This input passed fromBudgetBuddyintoParser#parseCommands(). - Within the
Parser, it determines that the input is a menu command fromisMenuCommand(), and creates a newMenuCommandCreatorobject. - The
Parserthen callsMenuCommandCreator#createCommand() - The checks for whether the input is valid, in particular whether it is a valid integer,
along with obtaining the value of
indexis done inMenuCommandCreator#handleMenuCommand() MenuCommandCreatorcreates a constructor forMenuCommandwith the parameter1, which in turn also constructs a newUiobjectMenuCommandCreatorreturns this createdMenuCommandtoParser, which is then returned toBudgetBuddyBudgetBuddythen callsMenuCommand#execute()execute()then callsUi#showMenuItem(1)showMenuItem()inUithen prints all commands forcase 1which is forManage Expenses
4.2 Add Expense Feature
The Add Expense Feature allows users to add expenses to different categories. AddExpenseCommand class enables this feature,
after initialized by the Parser class. Within the AddExpense object, the Parser would have initialized it with
4 variables, an ExpenseList object, along with a category, amount , description.
The relevance of these Class Attributes in AddExpenseCommand is as follows :
| Class Attribute | Variable Type | Relevance |
|---|---|---|
| expenses | ExpenseList | ExpenseList Object containing the list of expenses |
| category | String | The category that the expense belongs to |
| amount | String | The amount spent |
| description | String | The description of the expense |
Upon the call of the execute() method in BudgetBuddy using command.execute(),
the AddExpenseCommand Object utilizes the following method from the ExpenseList class to add it to the existing
list of expenses matching against the corresponding category.
| Method | Return Type | Relevance |
|---|---|---|
| addExpense() | void | Add expense to the existing list of expenses |
The following UML Sequence diagram shows how the Parser works to obtain the relevant inputs for the Add Expense Feature :
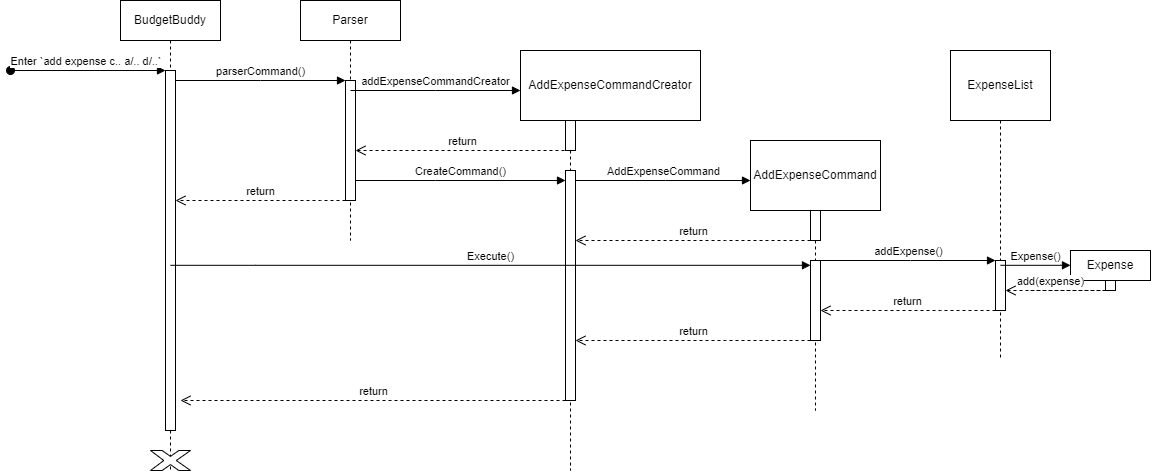
The following is a step-by-step explanation for the Parser for the Find Feature :
BudgetBuddycallsParser#parseCommand(input)withinputbeing the entire user input. E.gadd expense c/Transport a/20 d/EZ-Link Top Up- Within the
Parser, it will have determined that theinputis a Find Command from theisAddExpenseCommand(input)function. - The
Parserthen self calls the methodhandleAddExpenseCommand(input)with theinputstill being the entire user input. - Within
AddExpenseCommand(input), the first check would be the check for the existence of any combination ofc/ , a/ and d/. If none of these combinations were found, it immediately returnsnull. -
If the checks in
4.is passed, Three variables would be initialized.-
Variable Name Variable Type category String amount String description String
-
- Depending on which parameters were present, the corresponding input would be extracted and placed into each variable
using the
Parser#extractDetailsForAdd(input, "parameter") - Finally,
Parser#handleAddExpenseCommand()returns aAddExpensesCommandtoParser#parseCommand(), which is then returned toBudgetBuddy
4.3 Add Savings Feature
The Add Savings Feature allows users to add savings to different categories. AddSavingCommandCreator class intialises the AddSavingCommand, after initialised by the Parser class. Within the AddSavings object, the Parser would have initialized it with
4 variables, a SavingList object, along with a category, amount.
The relevance of these Class Attributes in AddExpenseCommand is as follows :
| Class Attribute | Variable Type | Relevance |
|---|---|---|
| savings | SavingList | SavingList Object containing the list of savings |
| category | String | The category that the expense belongs to |
| amount | String | The amount spent |
Upon the call of the execute() method in BudgetBuddy using command.execute(),
the AddSavingCommand Object utilizes the following method from the SavingList class to add it to the existing
list of savings matching against the corresponding category.
| Method | Return Type | Relevance |
|---|---|---|
| addSaving() | void | Add savings to the existing list of savings |
The following UML Sequence diagram shows how the Parser works to obtain the relevant inputs for the Add Expense Feature :
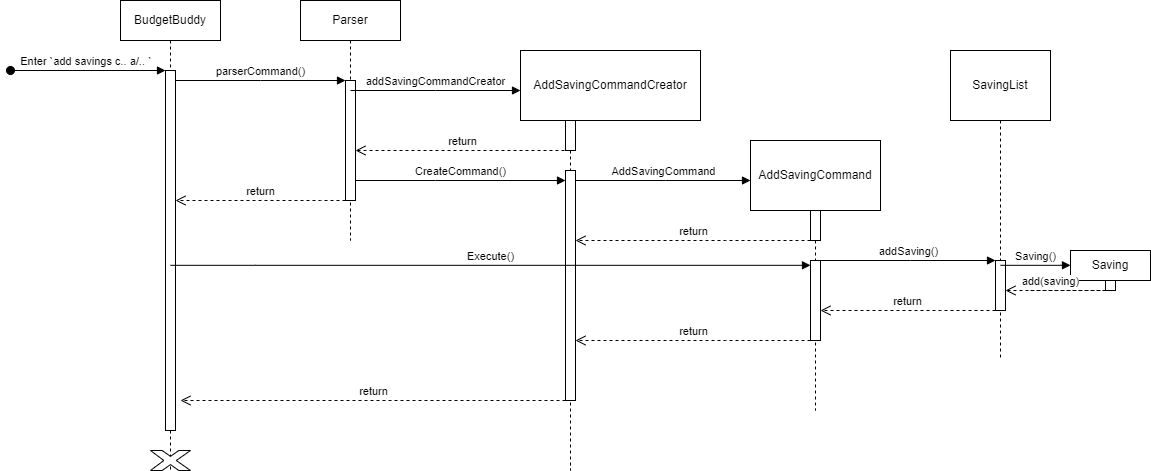
The following is a step-by-step explanation for the Parser for the Find Feature :
BudgetBuddycallsParser#parseCommand(input)withinputbeing the entire user input. E.gadd savings c/Allowance a/20- Within the
Parser, it will have determined that theinputis a Find Command from theisAddSavingsCommand(input)function. - The
Parserthen self calls the methodhandleAddExpenseCommand(input)with theinputstill being the entire user input. - Within
AddExpenseCommand(input), the first check would be the check for the existence of any combination ofc/ , and a/. If none of these combinations were found, it immediately returnsnull. -
If the checks in
4.is passed, two variables would be initialized.-
Variable Name Variable Type category String amount String
-
- Depending on which parameters were present, the corresponding input would be extracted and placed into each variable
using the
Parser#extractDetailsForAdd(input, "parameter") - Finally,
Parser#handleAddExpenseCommand()intialises aAddExpensesCommandCreatorwhich then returnsAddSavingCommandtoParser#parseCommand(), which is then returned toBudgetBuddy.
4.4 Add Shared Bill feature
The Add Shared Bill Feature allows users to enter expenses that are shared among multiple parties, facilitating easy splitting and tracking of such expenses. The feature is managed by the SplitExpenseCommand class, which is initialized by the SplitExpenseCommandCreator as a result of the Parser class interpretation.
Class Attributes for SplitExpenseCommand:
| Class Attribute | Variable Type | Relevance |
|---|---|---|
| splitExpenseList | SplitExpenseList | SplitExpenseList O bject where the shared bill will be added |
| amount | double | The total amount of the shared bill |
| numerOfPeople | int | The number of people that are meant for splitting the bill |
| description | String | Description of the shared bill |
Upon the call of the execute() method via command.execute(), SplitExpenseCommand performs the following key actions:
- It adds the shared bill as an expense to the ExpenseList.
- Calculates each participant’s share based on the total amount divided by the number of participants.
Key Methods used from SplitExpenseList
| Method | Return Type | Relevance |
|---|---|---|
| addSplitExpense() | void | Adds the splitexpense to the list of splitexpenses |
The SplitExpenseCommand also provides an output summarizing the shared expense, each participant’s share.
Sequence Diagram for Adding a Shared Bill
The sequence diagram illustrates the flow from when a user inputs a command to add a shared bill to its execution:
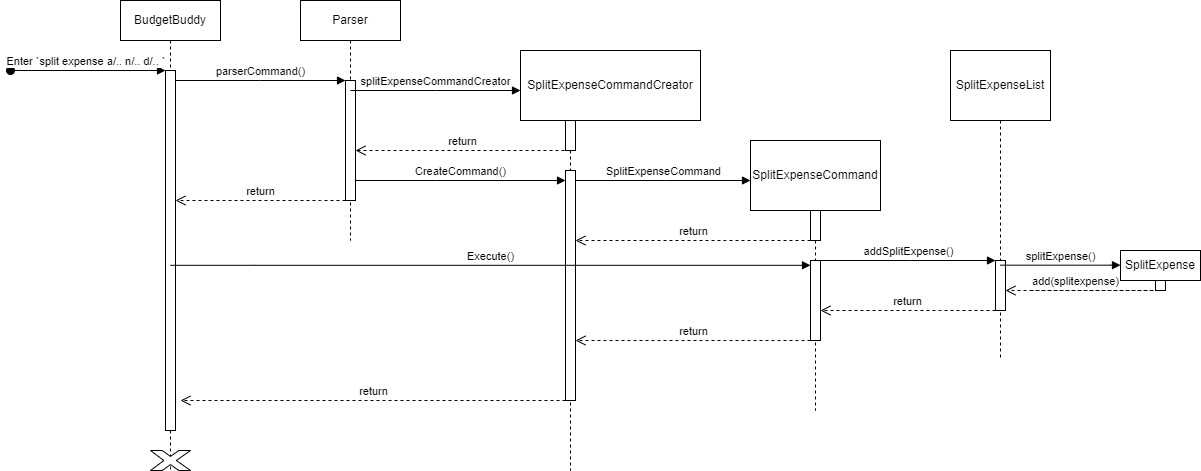
User Input: The user inputs a command in the format add shared bill a/<Amount> n/<NumberOfPeople> d/<Description>
Parsing: The Parser class identifies the input as a shared bill command and extracts the necessary parameters (amount, number of people, description).
Command Initialization: The Parser initializes a SplitExpenseCommand with the extracted parameters.
Execution: The SplitExpenseCommand is executed, which calls addSplitExpense() on the SplitExpenseList to add the shared bill.
Calculation: The command calculates each participant’s share of the bill and records it.
4.5 Edit Savings Feature
The Edit Savings feature allows users to update their previously saved financial contributions, specifically adjusting
the category and amount. This feature is facilitated by the EditSavingCommand class, which is prepared and issued
by the Parser class. An EditSavingCommand object encapsulates several variables that are instantiated within the
Parser: a SavingList object, category, and amount. The significance of these Class Attributes within
EditSavingCommand is detailed below:
| Class Attribute | Variable Type | Relevance |
|---|---|---|
| savings | SavingList | SavingList Object containing the list of savings that can be modified |
| category | String | The updated category for the saving entry at the specified index |
| amount | Double | The updated monetary value for the saving entry at the specified index |
Upon invoking the execute() method in BudgetBuddy through command.execute(), the EditSavingCommand object
leverages the following method from the SavingList class to carry out the modification:
| Method | Return Type | Relevance |
|---|---|---|
| editSaving() | void | Adjusts the amount for the saving entry at the provided category |
The following UML Sequence diagram illustrates the execution process of the Edit Savings Feature Command when a user enters a valid edit savings command:
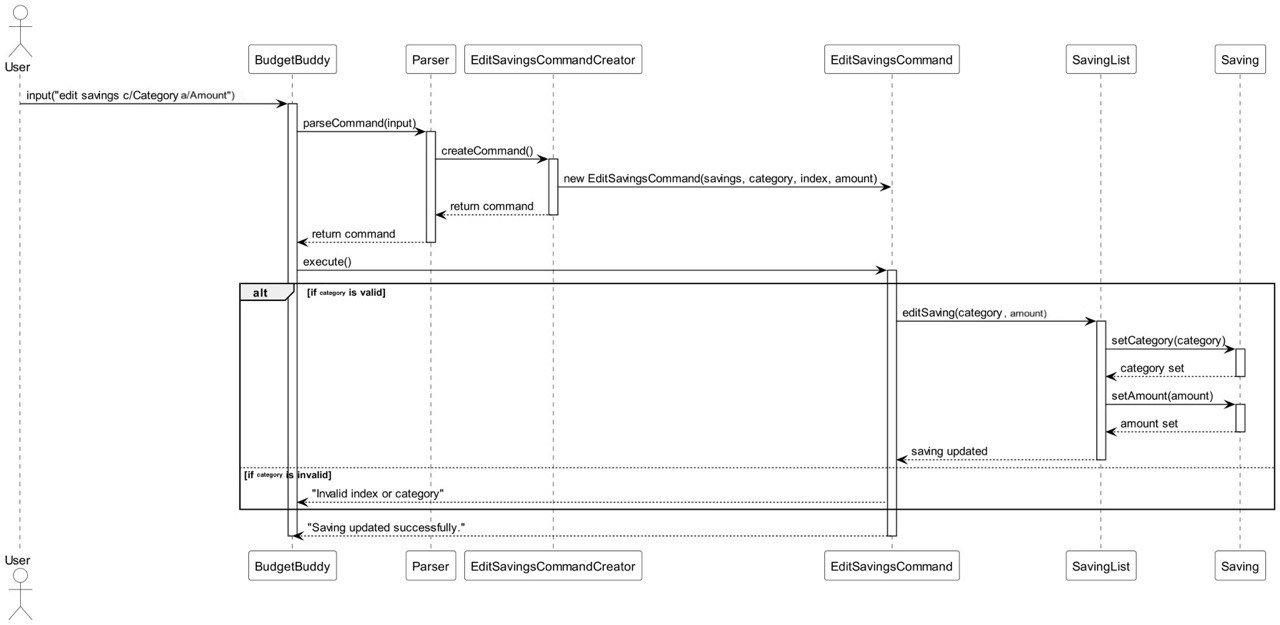
Here is a step-by-step narrative of the actions taken for a sample input:
edit savings c/Salary a/3000
- BudgetBuddy receives the command
edit savings c/Salary a/3000and passes it to theParserfor interpretation. - The
Parsersplits the command into components and constructs anEditSavingCommandobject with the category (c/Salary) and amount (a/3000). - The
Parserreturns the constructedEditSavingCommandobject to BudgetBuddy. - BudgetBuddy then executes the
execute()method on theEditSavingCommandobject. - Inside its
execute()method,EditSavingCommandcalls theeditSavingmethod ofSavingList, supplying the relevant parameters. SavingListupdates the entry’s amount to 3000 for the category Salary.- Finally, the console outputs a confirmation message: “Saving updated successfully.”
4.6 Edit Expense Feature
The Edit Expense feature allows users to edit their previously added expenses, specifically the category, amount,
and description. This feature is managed by the EditExpenseCommand class, which is initialized by the
Parser class. Within the EditExpenseCommand object, 5 variables would have been initialized in the Parser class:
an ExpenseList object, category, index, amount and description. The relevance of these Class Attributes in
EditExpenseCommand is as follows:
| Class Attribute | Variable Type | Relevance |
|---|---|---|
| expenses | ExpenseList | ExpenseList Object containing the list of expenses that can be edited |
| category | String | The edited category for the expense in the specified index |
| index | Integer | The index of the expense to be edited from ExpenseList |
| amount | Double | The edited amount the expense in the specified index should be |
| description | String | The edited description for the expense in the specified index |
When the execute() method in BudgetBuddy is called via command.execute(), the EditExpenseCommand Object,
utilizes the following method from the ExpenseList class to edit the expense.
| Method | Return Type | Relevance |
|---|---|---|
| editExpense() | void | Edits the category, amount and description for the expense in the specified index |
The following UML Sequence diagram below shows how the Edit Expense Feature Command is executed when a user inputs a valid edit expense command:
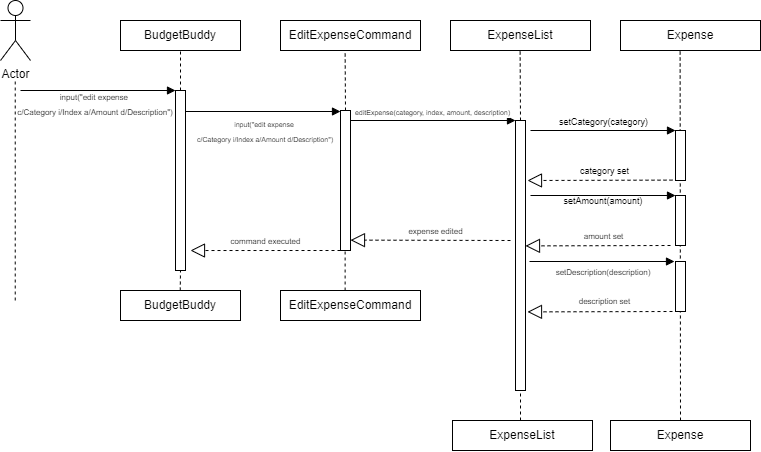
The following is a step by step explanation of the processes that occur for an example input:
edit expense c/Transport i/2 a/40 d/GRAB
- The BudgetBuddy application receives the input string
edit expense c/Transport i/2 a/40 d/GRABand uses theParserto interpret it. - The
Parsersplits the input into parts and constructs aEditExpenseCommandObject with the category (c/Transport), index (i/2), amount (a/40), and description (d/GRAB). Parserreturns this calledEditExpenseCommandObject toBudgetBuddy.- The
BudgetBuddyapplication callsexecute()on theEditExpenseCommandobject. - The
EditExpenseCommandobject callseditExpenseon theExpenseListwith the provided parameters. - The
ExpenseListlooks up the second expense in its list (as lists are zero-indexed, it uses index - 1 to access the correct item), and updates this expense’s category to “Transport,” amount to 40.0, and description to “GRAB.” - A message “Expense edited successfully.” is printed to the console.
4.7 Reduce Savings Feature
The Reduce Savings feature enables users to decrement a specified amount from their savings at a given index. This
functionality is controlled by the ReduceSavingCommand class, which is produced by the ReduceSavingCommandCreator
based on user input. The ReduceSavingCommand class uses a SavingList object to access the relevant saving and performs
the reduction operation using the provided index and amount. Below is the relevance of these attributes:
| Class Attribute | Variable Type | Relevance |
|---|---|---|
| savings | SavingList | The SavingList object containing the list of savings which can be reduced |
| category | String | TThe category of savings to reduce |
| amount | double | The amount by which the savings in the specified category should be reduced |
When BudgetBuddy runs the execute() method through command.execute(), the ReduceSavingCommand leverages the reduceSavingsByCategory method from the SavingList class:
| Method | Return Type | Relevance |
|---|---|---|
| reduceSavingsByCategory() | void | Decreases the savings by a specified amount in a given category |
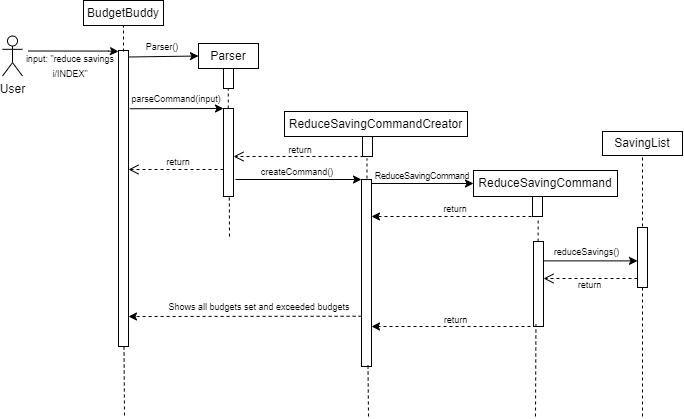
The user interaction for reducing savings follows these steps:
- The user commands to reduce savings by inputting
reduce savings c/[category] a/[amount]. BudgetBuddyprocesses this input with the help of aParser, which identifies the suitableCommandCreator.Parserconstructs aReduceSavingCommandobject with the extracted category and amount.BudgetBuddythen executes theReduceSavingCommand.- The
execute()method within ReduceSavingCommand calls the SavingList’s reduceSavingsByCategory function. - The
reduceSavingsByCategorymethod performs the deduction and updates the savings amount.
The following UML Sequence diagram below shows how the Reduce savings Feature Command is executed when a user
inputs a valid reduce savings command:
4.8 Delete Expenses Feature
The Delete Expense feature grants users the capability to remove expenses they have previously entered. Managed by the
DeleteExpenseCommand class, this feature is initialized through DeleteExpenseCommandCreator. During the creation process,
the command is provided with an ExpenseList object and an index indicating the specific expense to be deleted.
The following table outlines the significance of these attributes:
| Class Attribute | Variable Type | Relevance |
|---|---|---|
| expenses | ExpenseList | ExpenseList Object containing the list of expenses that can be edited |
| index | Integer | The edited category for the expense in the specified index |
On invocation of the execute() method, as part of the command.execute() flow within BudgetBuddy, the DeleteExpenseCommand
object engages the deleteExpense() method from the ExpenseList class.
| Method | Return Type | Relevance |
|---|---|---|
| deleteExpense() | void | Removes the expense at the specified index from the list |
The user interaction for deleting expenses follows these steps:
- The user submits a delete command in the format
delete expense i/index, withindexspecifying the expense to be deleted. BudgetBuddyreceives the command and employs the Parser to deconstruct it.- The
Parserdiscerns the delete command, extracting the index value and forming a DeleteExpenseCommand object. BudgetBuddytriggers the DeleteExpenseCommand.execute() method.- Inside
execute(), thedeleteExpense()method is called onExpenseList, withindexindicating the targeted expense. - If the index is valid, the expense is removed, and a confirmation message is printed to the console.
4.9 Listing Feature (List Savings)
The Listing Savings Feature enables users to view their savings, potentially filtered by a specific category. This functionality is orchestrated by the ListSavingsCommand class, which is initialized by the ListCommandCreator class. Within the ListSavingsCommand object, the ListCommandCreator provides it with a SavingList object, an ExpenseList object, along with an optional filterCategory. The relevance of these class attributes in ListSavingsCommand is detailed in the following table:
| Class Attribute | Variable Type | Relevance |
|---|---|---|
| savings | SavingList | The SavingList object containing the list of savings to be displayed or filtered |
| expenses | ExpenseList | The ExpenseList object containing the list of expenses |
| filterCategory | String | The category to filter the savings by, if provided |
When BudgetBuddy invokes the execute() method via command.execute(), the ListSavingsCommand object uses several methods from the SavingList class to perform its tasks:
| Method | Return Type | Relevance |
|---|---|---|
| getSavings() | ArrayList |
Retrieves the list of all savings from the SavingList |
| findTotalSavings() | void | Calculates the total amount of savings stored in SavingList |
| listSavings() | void | Prints the savings, filtered by filterCategory, to the CLI |
| calculateRemainingSavings() | double | Calculates the remaining amount after deducting total expenses |
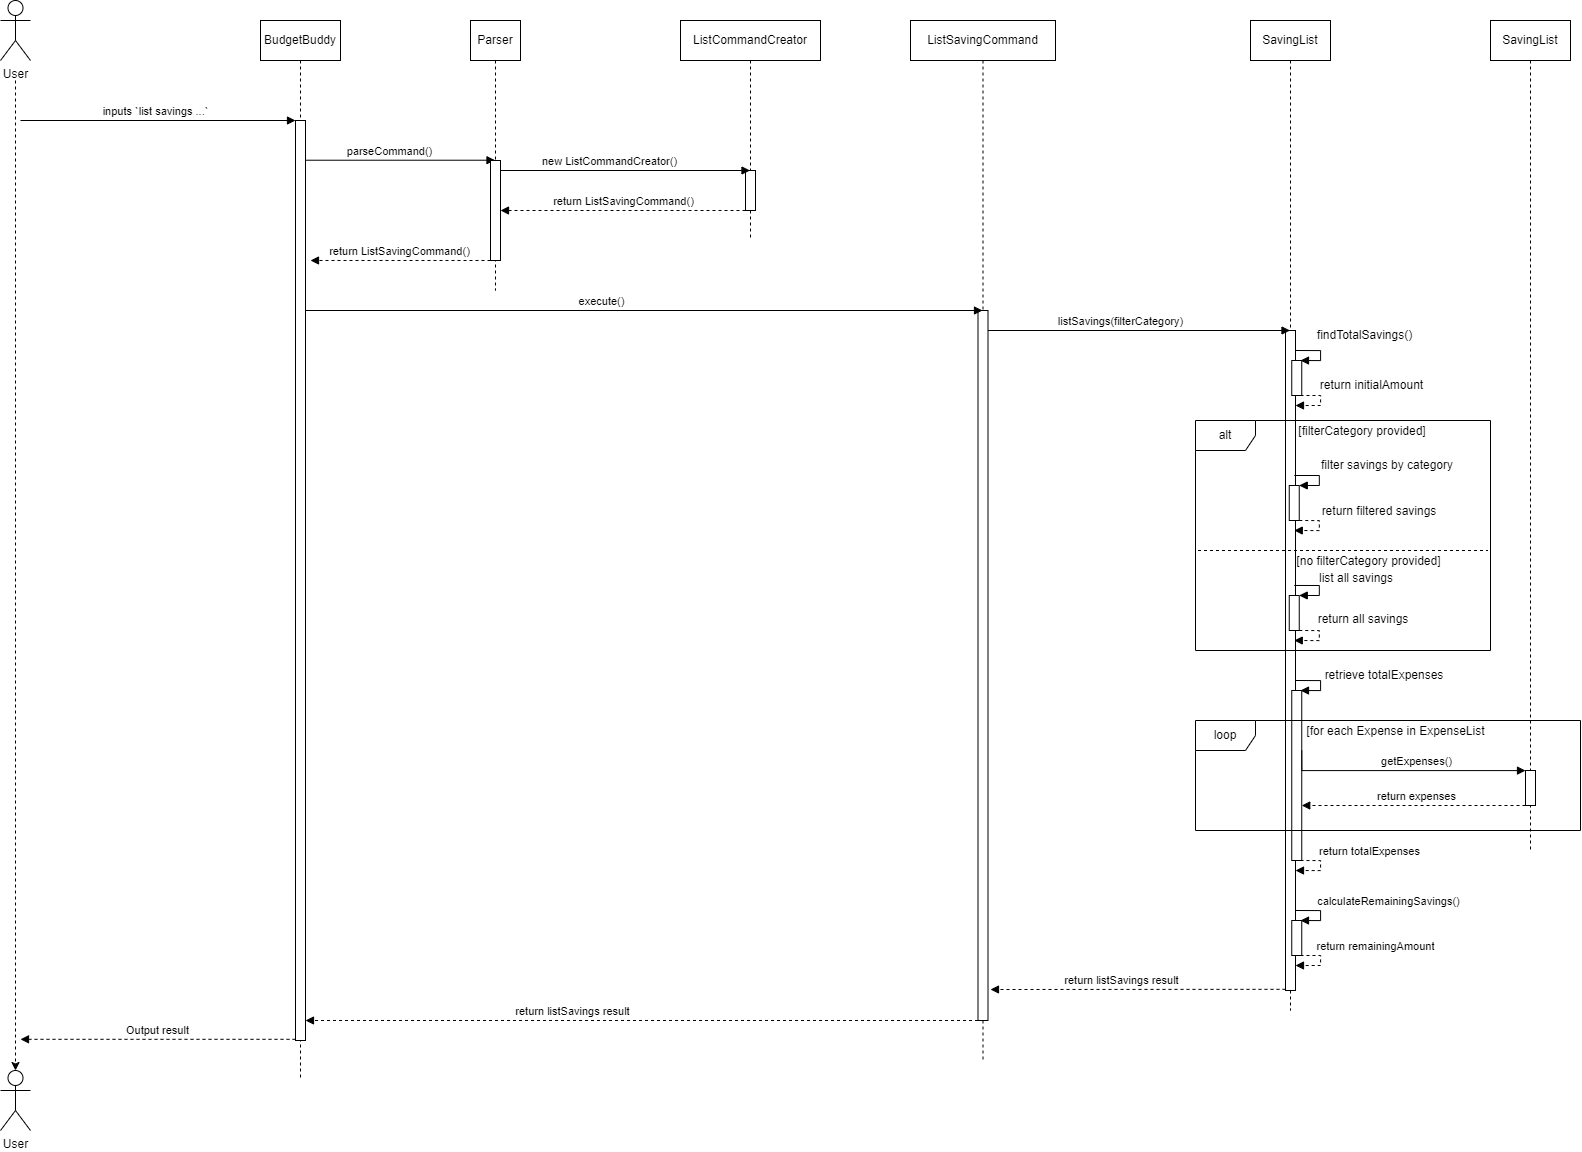
The Listing Savings feature follows these steps when a user inputs a command to list savings:
- The user inputs
list savings [optional: filterCategory]. This input is processed by theParserclass inBudgetBuddy, which creates aListSavingsCommandobject withsavingsset to the currentSavingListandfilterCategoryto the user-specified category, if any. - The
Parserreturns thisListSavingsCommandobject toBudgetBuddy, which callsListSavingsCommand.execute(). execute()callsSavingList.listSavings(filterCategory, expenses), where thefilterCategoryis applied if provided.- Within
listSavings(), thefindTotalSavings()method is called first to calculate the initial total savings amount. - The
listSavings()method continues by iterating through eachSavingand printing those that match thefilterCategorycriteria. - After listing, the method calculates and displays the remaining savings by calling
calculateRemainingSavings(initialAmount, totalExpenses), accounting for any expenses deducted. - If the
filterCategoryis not provided, all savings are printed, and the total initial amount and remaining savings after expenses are displayed.
Sequence Diagram
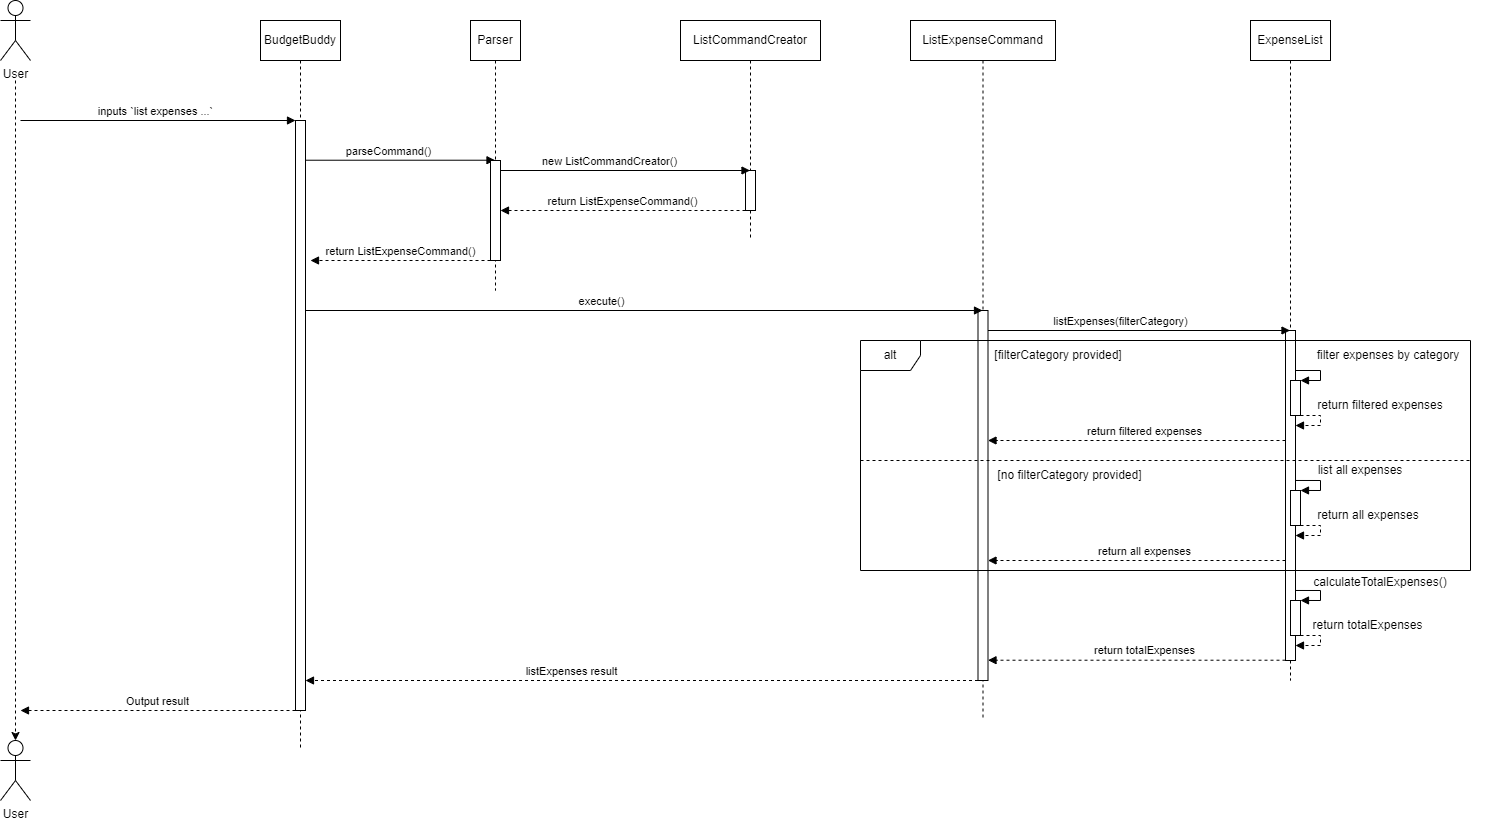
The UML Sequence diagram for the Listing Savings feature would illustrate the interactions between the User, BudgetBuddy, Parser, ListSavingsCommand, and SavingList classes, showing the method calls and returns between these objects to complete the operation.
4.10 Listing Feature (List Expenses)
The Listing Expenses Feature provides users with the ability to view their expenses, which can be filtered by category. The ListExpenseCommand class, generated by the ListCommandCreator, is responsible for this feature. The class utilizes the ExpenseList object to access and manipulate expense records, optionally applying a filter based on the category. The significance of the ListExpenseCommand class’s attributes is outlined below:
| Class Attribute | Variable Type | Relevance |
|---|---|---|
| expenses | ExpenseList | Holds the list of expenses to be filtered and listed |
| filterCategory | String | The category to filter the expenses by (null if no filtering is needed) |
Upon invoking the execute() method by BudgetBuddy through command.execute(), the ListExpenseCommand object calls upon several methods from the ExpenseList class to carry out its responsibilities:
| Method | Return Type | Relevance |
|---|---|---|
| listExpenses() | void | Prints the expenses, filtered by filterCategory, to the command line |
| calculateTotalExpenses() | double | Calculates the total expenses from the list of expenses |
Here’s an overview of the process flow when a user employs the Listing Expenses feature:
- The user types
list expenses [optional: filterCategory]. This command is parsed by theParserclass withinBudgetBuddy, which then creates aListExpenseCommandwithexpensesset to the currentExpenseListandfilterCategoryset to any specified by the user. - The
Parserreturns theListExpenseCommandobject toBudgetBuddy, which callsListExpenseCommand.execute(). - The
execute()method invokesExpenseList.listExpenses(filterCategory). If afilterCategoryis provided, it will filter the expenses accordingly. - The
listExpenses()method inExpenseListiterates over the list of expenses and prints each one that matches the filter category criteria or all expenses if no filter is provided. - The method concludes by displaying the total expenses calculated using
calculateTotalExpenses().
Sequence Diagram
The sequence diagram for the Listing Expenses feature would illustrate the above steps, showing the interactions between the User, BudgetBuddy, Parser, ListExpensesCommand, and ExpenseList classes.
4.11 Check Split Bill feature
The Check Split Bills Feature allows users to view a list of all bills that have been marked as split among multiple parties. This is particularly useful for tracking shared expenses in scenarios like shared accommodations, group trips, or joint projects.
Class Attributes for CheckSplitExpensesCommand:
| Class Attribute | Variable Type | Relevance |
|---|---|---|
| splitExpenseList | splitExpenseList | Object containing the list of split bills to display |
When BudgetBuddy executes the ListSplitExpenseCommand via command.execute(), the ListSplitExpenseCommand uses the following method from the SplitExpenseList class to retrieve and display all split expenses:
| Method | Return Type | Relevance |
|---|---|---|
| listSplitExpense | ArrayList |
Retrieves and displays a detailed list of all recoreded split expenses |
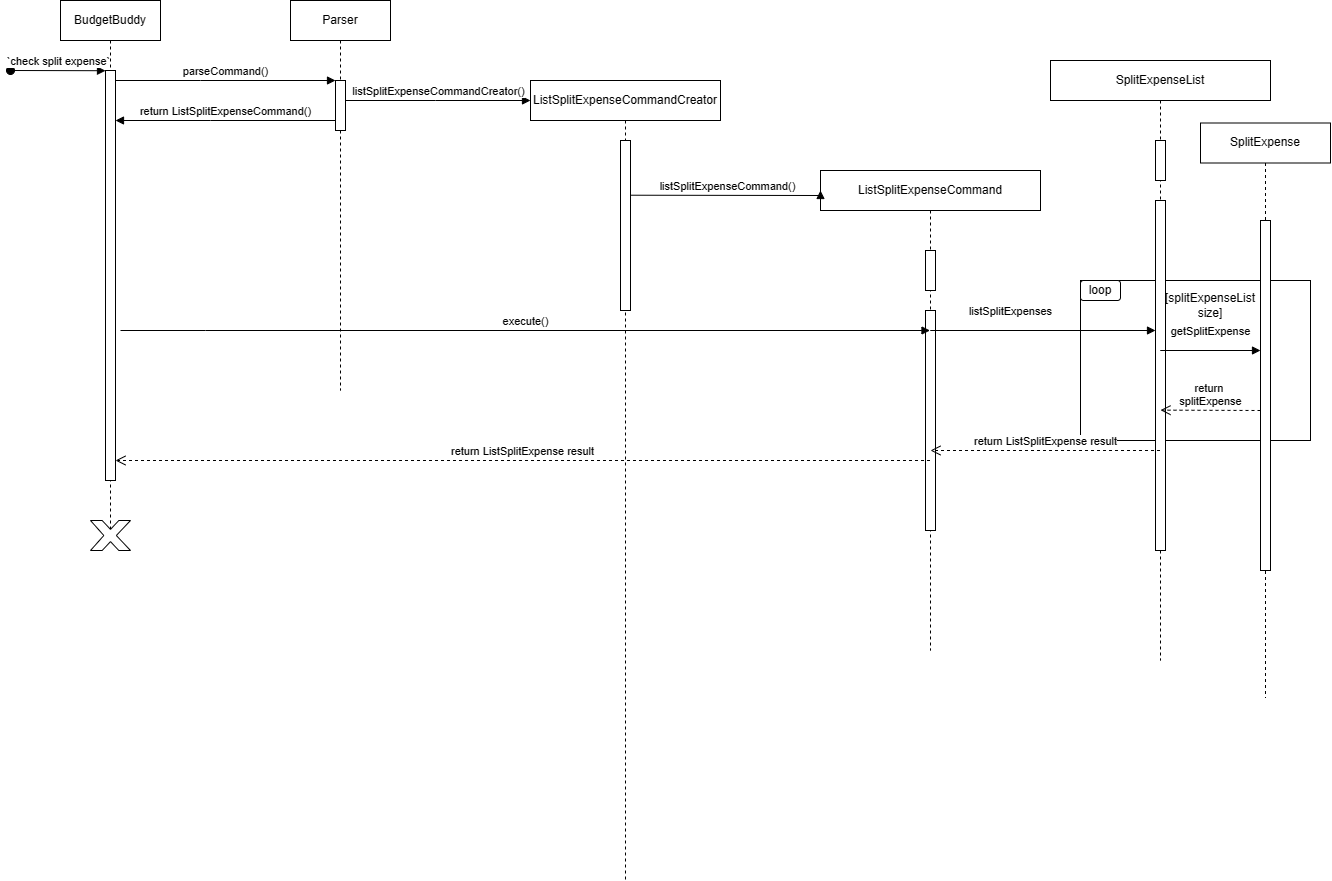
Process Overview:
- The user issues a command to check split expenses e.g.
check split bills. 1BudgetBuddyprocesses this input with the help of aParser, which then initialises theListSplitExpenseCommandCreator. - The
Parserconstructs aListSplitExpenseCommandwith the split expenses list as a parameter. BudgetBuddythen executes theListSplitExpenseCommand.- The
execute()method within theListExpenseCommandcalls thelistSplitExpenses()method on theSplitExpenseList. - The
listSplitExpenses()method retrieves all split expenses and formats them for display. - Each split expense is printed out, showing details including the description of the split expense, the number of people in the bill and the amount payable by each person.
Sequence Diagram:
The sequence diagram for the Check Split Expenses feature would illustrate the interactions between the User, BudgetBuddy, Parser, CheckSplitExpensesCommand, and SplitExpenseList classes, showing how the method calls and returns between these objects complete the operation to display all split expenses.
4.12 Settle Bill feature
The Settle Bill Feature allows users to mark shared bills as settled, which is crucial for tracking repayments in scenarios such as shared accommodations or group outings.
Class Attributes for SettleBillCommand:
| Class Attribute | Variable Type | Relevance |
|---|---|---|
| splitExpenseList | SplitExpenseList | Object containing the list of shared bills to be settled |
When BudgetBuddy executes the SettleSplitExpenseCommand via command.execute(), the SettleSplitExpensesCommand uses the following method from the SplitExpenseList class to delete the bill:
| Method | Return Tyoe | Relevance |
|---|---|---|
| settleSplitExpense(index) | void | Marks the split expense at the given index as settled |
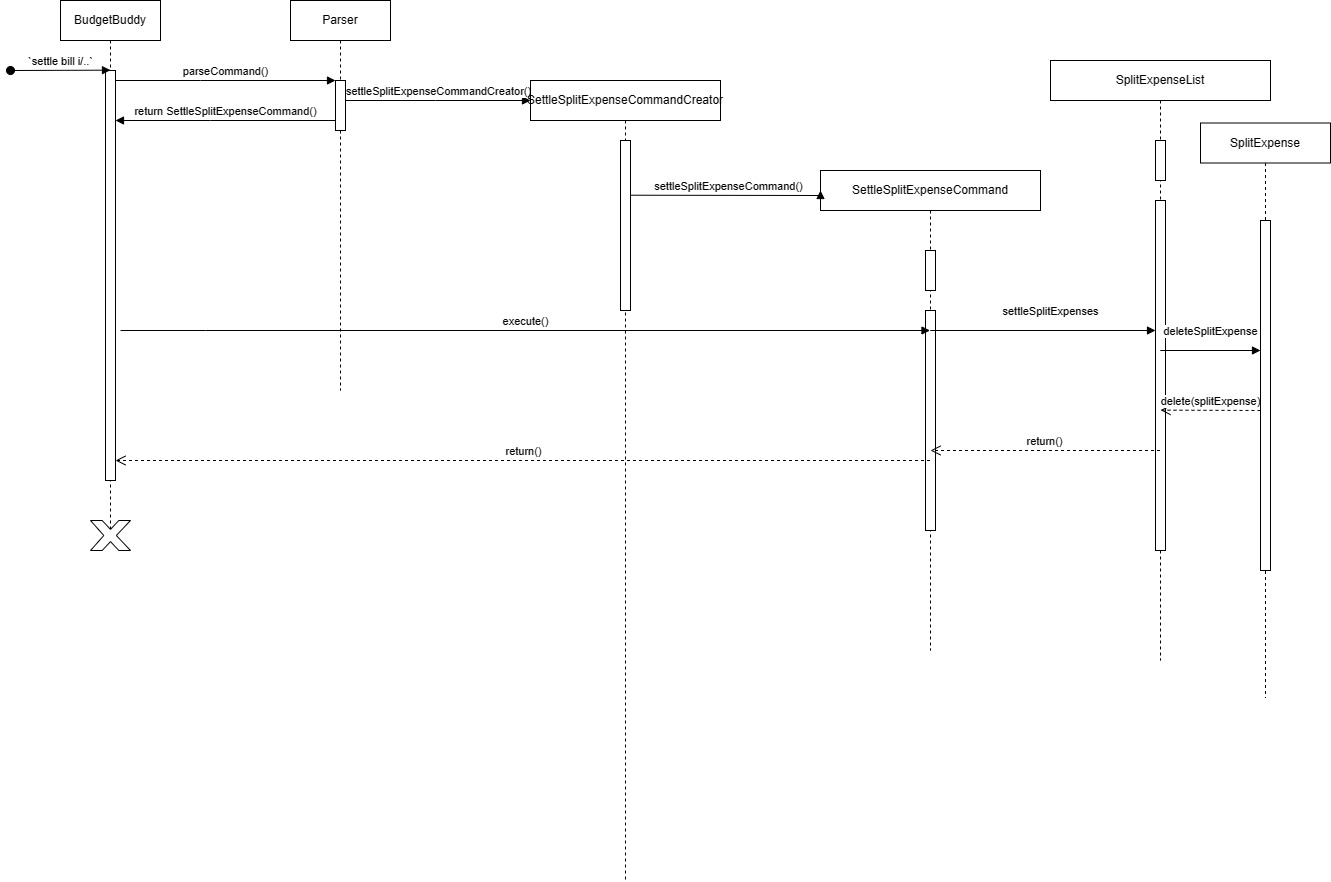
Process Overview:
- The user issues a command to settle a bill, e.g.,
settle bill 3. BudgetBuddyprocesses this input with the help of aParser, which initialises theSettleSplitExpenseCommandCreator.- The
Parserconstructs aSettleSplitExpenseCommandwith the split expense list and index as parameters. BudgetBuddythen executes theSettleSplitExpenseCommand.- The
execute()method withinSettleSplitExpenseommandcalls thesettleSplitExpense(index)method on theSplitExpenseList. - The
settleSplitExpense(index)method deletes the shared bill at the specified index. - A confirmation message is displayed, informing the user that the bill has been settled.
Sequence Diagram:
The sequence diagram for the Settle Bill feature would illustrate the interactions between the User, BudgetBuddy, Parser, SettleSplitExpenseCommand, and SplitExpenseList classes, showing how the method calls and returns between these objects complete the operation to mark a shared bill as settled.
4.13 Find Feature
The Find Feature allows users to search for expenses based on a specific criteria such as description, minimum amount
and maximum amount. This feature is orchestrated by the FindExpensesCommand class, which is created by the FindExpensesCommandCreator
, which is in turn created by the Parser. Within the FindExpensesCommand object, the FindExpensesCommandCreator
would have initialized it with 4 variables, an ExpenseList object, along with a description, minAmount ,
maxAmount. The relevance of these Class Attributes in FindExpensesCommand is as follows :
| Variable Name | Variable Type | Relevance |
|---|---|---|
| expenses | ExpenseList | ExpenseList Object containing the list of expenses which will be filtered |
| description | String | The description to match against expenses in expenses |
| minAmount | Double | The minimum amount matched expenses should be |
| maxAmount | Double | The maximum amount matched expenses should be |
Upon the call of the execute() method in BudgetBuddy using command.execute(),
the FindExpensesCommand Object, utilizes the following methods from the ExpenseList class in order to both
obtain a new ExpenseList object containing the filtered expenses, along with printing them.
| Method | Return Type | Relevance |
|---|---|---|
| filterExpenses() | ArrayList |
Returns an ArrayList |
| listExpenses() | void | Prints the filtered expenses obtained from filterExpenses() |
Important Note : As the process of how the CommandCreator is created upon the receipt of a user input has already been
discussed in 3.4 CommandClass, the following Sequence Diagrams would omit the initial methods prior to the
FindCommandCreator being created.
The following UML Sequence diagram below shows how FindExpensesCommandCreator works to obtain the relevant inputs for the FindExpensesCommand, NOTING that the Parser has already determined the input to be a find expenses command, and has also created the FindExpensesCommandCreator.
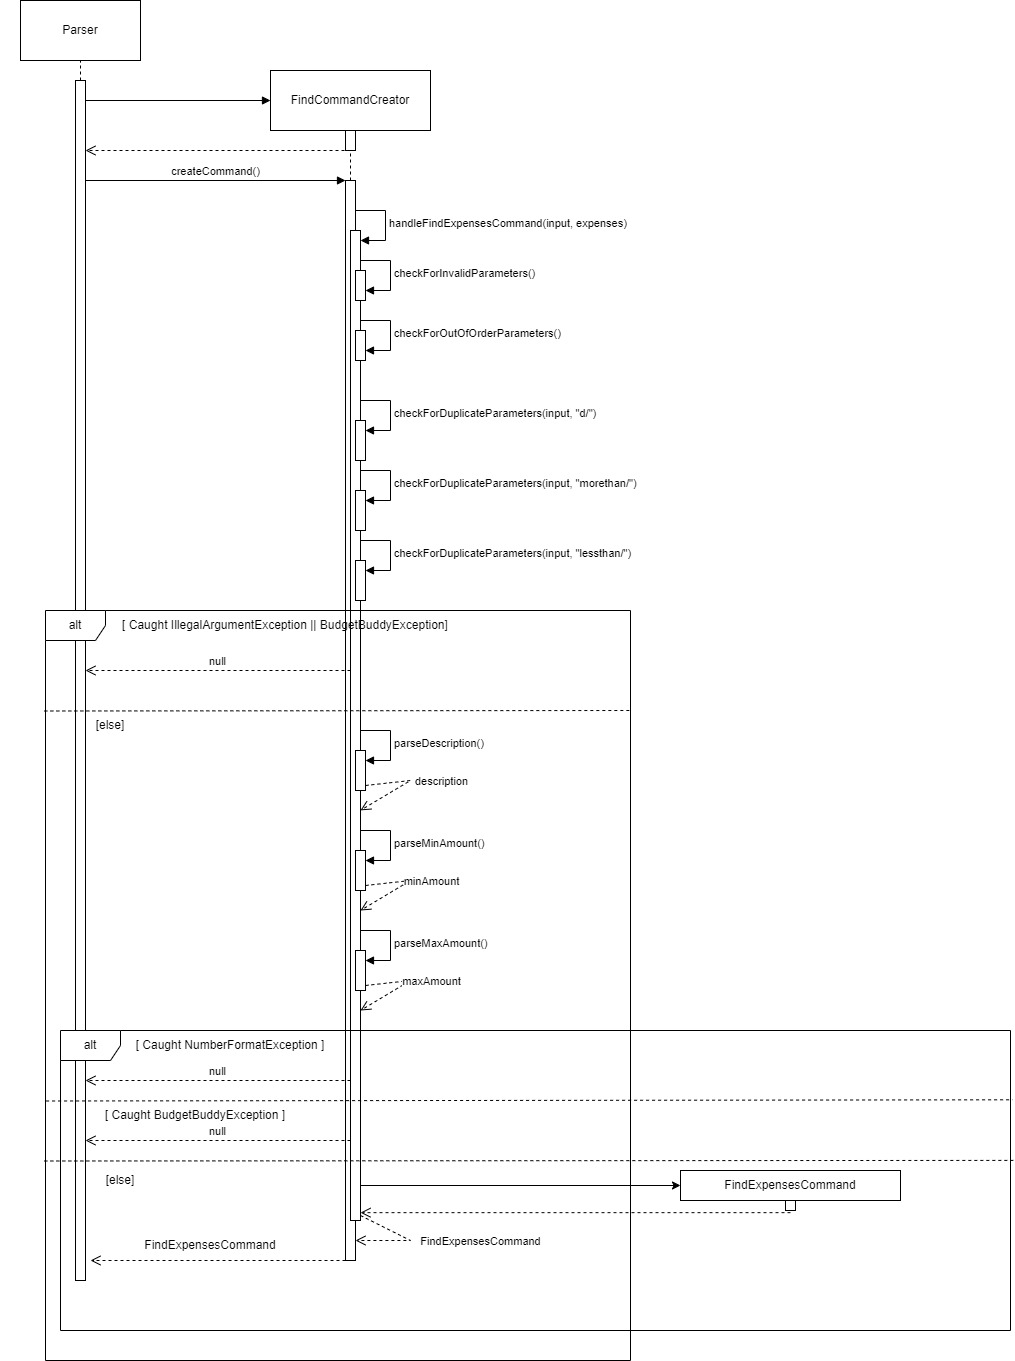
Given that multiple methods are called in FindExpensesCommandCreator. The following is a step-by-step explanation for the processes that occur before the FindExpensesCommand is created :
BudgetBuddycallsParser#parseCommand(input)withinputbeing the entire user input. E.gfind expenses d/bruno morethan/ lessthan/- Within the
Parser, it will have determined that theinputis a Find Command from theisFindCommand(input). - The
Parserthen creates aFindExpensesCommandCreatorobject, initializing it with the overall Expense List and the provided user input - The
Parserthen callsFindExpensesCommandCreator#createCommand(). FindExpensesCommandCreator#createCommand()then callsFindExpensesCommandCreator#handleFindExpensesCommand()- Within
handleFindExpensesCommand(input), the first check would be the check for the existence of any combination ofd/ , morethan/ and lessthan/using the methodcheckForInvalidParameters(). If none of these combinations were found, it immediately returnsnull - This is then followed by a second check
checkForOutOfOrderParameters(), which checks whetherd/,morethan/andlessthan/is in the right order. - This is then followed by a third check
checkForDuplicateParameters(), which checks for duplicates of parameters in the user input. It duplicates are found, similarly, it immediately returnsnull. -
If the checks in
6.7.and8.is passed, or in this case No Exceptions are thrown. Three variables would be initialized.-
Variable Name Variable Type description String minAmount Double maxAmount Double
-
- Depending on which parameters were present, the corresponding input would be extracted from the full user input and placed into each variable
using the
FindExpensesCommandCreator#parse*(), where*represents the variable name we wish to obtain. - Note that any parameters left empty, would be treated as null.
- Should the values of
minAmountandmaxAmountnot be empty, a check is done to ensureminAmountis less than or equals tomaxAmount. If this check does not pass, the function immediately returnsnull - Finally,
FindExpensesCommandCreator#handleFindExpensesCommand()creates and returns aFindExpensesCommandcontaining the extracted description, minAmount and maxAmount FindExpensesCommandCreator#createCommand(), which is returned to,Parser#parseCommand(), which is then returned toBudgetBuddy
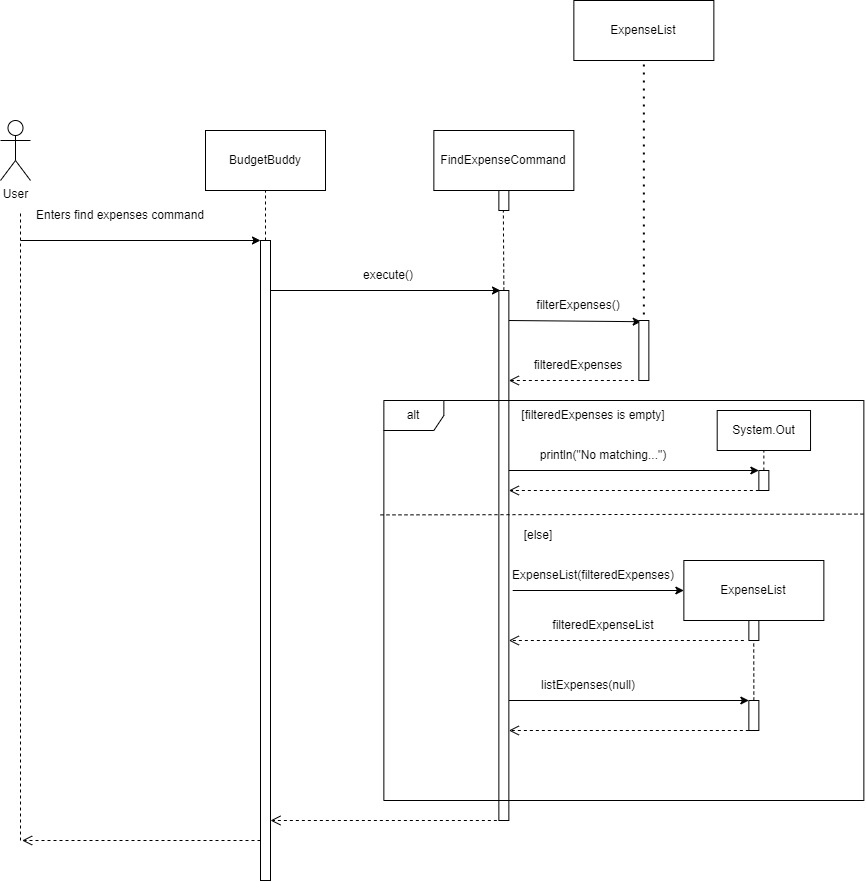
The following UML Sequence diagram below shows how the Find Feature command works when a user provides a valid find expenses command upon the call of its execute() method:
Important Note : Although d/ , morethan/ and lessthan/ are optional parameters, the optional component would mean
user has left that option empty if not in use, e.t.c find expenses d/ morethan/ lessthan/200. Hence,
unused parameters are treated as null variables instead.
Important Note 2 : Although the UI class is also initialized, the details of its use is omitted as its functionality in the Find Feature is trivial. In this case, the UI class is only used to print dividers.
The following is an example of the processes that occur when the user uses the find expenses feature:
- The user types
find expenses d/bruno morethan/30 lessthan/200. This input is passed through theParserclass fromBudgetBuddy, which constructs aFindExpenseCommandCreatorObject. TheFindExpenseCommandCreatorthen creates aFindExpenseCommandobject with its variables initialized toexpenses : current overall ExpenseList,description : bruno,minAmount : 30,maxAmount : 200, by callingFindExpenseCommandCreator#createCommand(). Parserreturns this createdFindExpenseCommandObject toBudgetBuddyandBudgetBuddycallsFindExpenseCommand#execute()execute()is called, which initializes a variablefilteredExpensesof typeArrayList<Expense>.execute()then callsExpenseList#filterexpenses(), which returns the filtered expenses based on thedescription,minAmountandmaxAmount, into thefilteredExpensesvariable.- If
filteredExpensesis empty, “No Matching Expenses Found” is printed andexecuteends here. - If
filteredExpensesis not empty,execute()then initializes a new variablefilteredExpenseListof typeExpenseListwithfilteredExpensesinitialized as theexpensesClass attribute. - Finally
execute()callsfilteredExpenseList#listexpenses()to print filtered expenses into the CLI.
4.14 Recurring Expenses Feature
The Recurring Expenses feature allows users to create list(s) of expenses, where each list can be added to
the overall expenses in a single command. This feature includes the creation of a list of expenses, the viewing of
all/each list of expenses and the removal of each list of expenses. All functions are orchestrated by the
RecurringExpenseCommand class, which would have been created by the RecurringExpenseCommandCreator, which is in turn
created by the Parser class. When RecurringExpenseCommand#execute() is called by BudgetBuddy, it utilizes methods
present in ExpenseList, RecurringExpenseList and RecurringExpenseLists to facilitate the relevant features.
Within the RecurringExpenseCommand, the following variables would be initialized :
| Variable | Variable Type | Relevance |
|---|---|---|
| overallExpenses | ExpenseList | Refer to the overall Expense List storing all of User’s Expenses |
| initialListName | String | Used as the name of the new list that will be created |
| commandType | String | Type of RecurringExpenseCommand. E.g. newlist, viewlists, … |
| listNumber | int | Refers to the List Number of a recurring expense list shown during viewlists |
| category | String | Category of the Expense to be added when using newexpense |
| amount | Double | Amount of Expense to be added when using newexpense |
| description | String | Description of Expense to be added when using newexpense |
When viewing the code, you would notice that there are 5 different constructors in RecurringExpensesCommand. These
constructors correspond to the different commandTypes present. Each constructor would initialize only the required
parameters for the specified commandTypes.
A switch statement in RecurringExpensesCommand is used, where it runs the corresponding function according to the
commandType. The following is the commandType, class-level methods used and methods utilized from other classes
when RecurringExpensesCommand#execute() is called
| commandType | Calls Method | Uses Methods From | |
|---|---|---|---|
| newlist | addNewList() | RecurringExpenseLists#addNewRecurringList() |
|
| viewlists | printList() | RecurringExpenseLists#printAllRecurringLists() |
|
| removelist | removeList() | RecurringExpenseLists#removeList() |
|
| newexpense | addExpenseToList() | RecurringExpenseLists#getExpenseListAtListNumber(), ExpenseList#addExpense() |
|
| addrec | addRecurringExpensesToExpenses() | RecurringExpenseLists#getExpenseListAtListNumber(), ExpenseList#getExpenses(), AddExpenseCommand#execute() |
|
| viewexpenses | printExpensesAtIndex | RecurringExpenseLists#getExpenseListAtListNumber() , ExpenseList#listExpenses() |
From the table above, most commandTypes have a fairly straight forward process of calling a single method from the relevant classes, and follows
a similar process to many of the previous features too. Hence, the explanation of these trivial methods would be left out to avoid repetition. For details regarding these methods, you may also view the JavaDoc comments found in the code.
However, the addrec commandType would be the most complicated to follow, given that it utilizes 3 methods from three different classes. The following
is a UML sequence diagram to illustrate the implementation of the addRecurringExpensesToExpenses() method in RecurringExpenseCommand, upon the call of the execute()
from BudgetBuddy
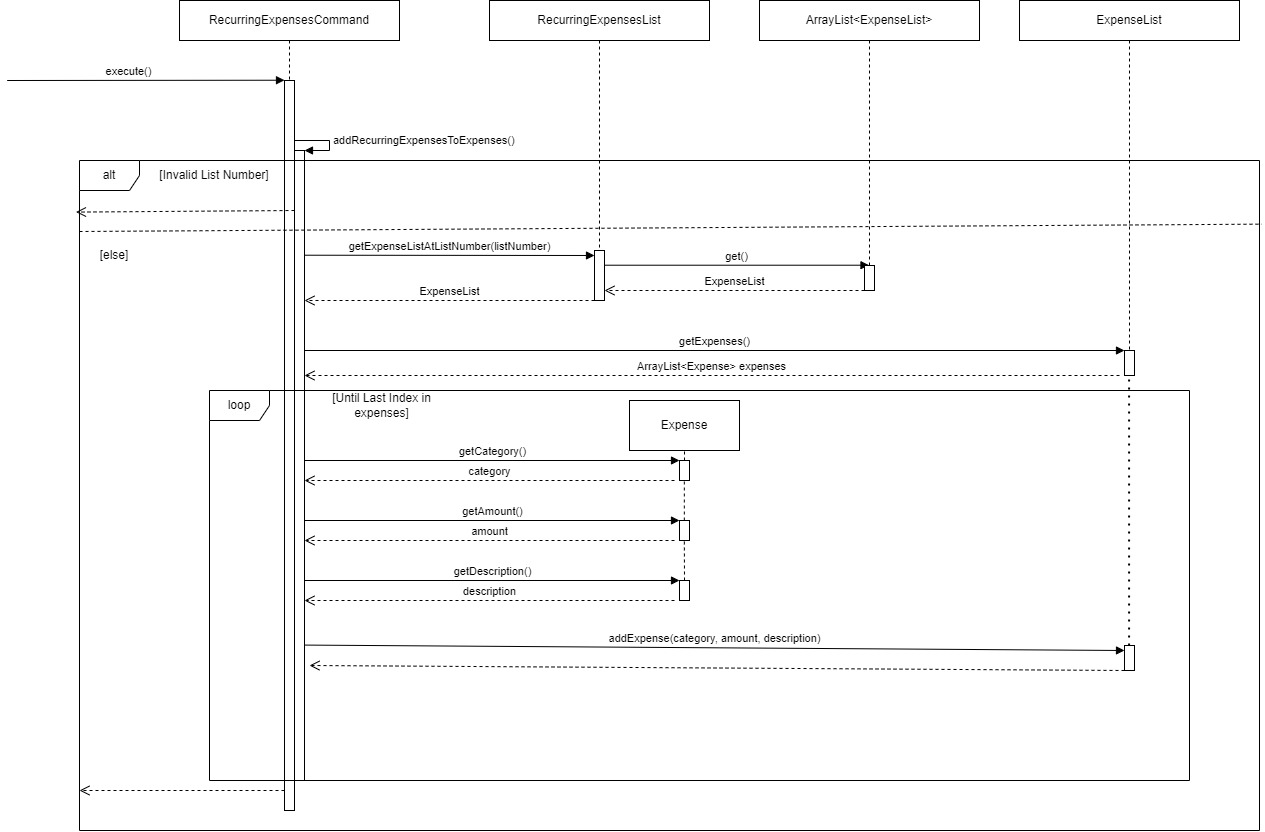
The following is an example of the processes that occur when the user uses the rec addrec command :
- The user types
rec addrec 1. This input is passed through theParserclass fromBudgetBuddy, which constructs aRecurringExpenseCommandCreator RecurringExpenseCommandCreatoridentifies that the command type isaddrec, obtains all the relevant parameters, and uses the constructorRecurringExpenseCommand(1, recurringExpenseLists, overallExpenses, addrec). Note thatrecurringExpenseListshere is the overall list containing all lists of recurring expenses andoverallExpensesis the user’s overall expenses.- The created
RecurringExpenseCommandis returned to theParser, which is then returned toBudgetBuddy. BudgetBuddycallsRecurringExpenseCommand#execute()- In
execute(),RecurringExpenseCommandidentifies it needs to perform aaddrecoperation from itscommandTypeand calls its ownaddRecurringExpensesToExpenses() - The first check is passed as the listNumber is a valid number. If the listNumber is invalid, an error message is printed, and the method would have ended here after printing an error message.
- The
recurringExpenseListwe wish to add into theoverallExpensesis obtained utilizingRecurringExpensesList#getExpenseListAtListNumber(listNumber)wherelistNumberis1. - Next the
ArrayList<Expense> expensesis extracted by utilizingExpenseList#getExpenses()from our extractedrecurringExpenseList - Lastly, a for loop is utilized, extracting the
category,amountanddescriptionof all the expenses present inexpensesand adding them one by one into theoverallExpenses. This is done so by creating a newAddExpenseCommandwith the relevant parameters and executing it. FOr more details regarding thisAddExpenseCommand, do refer to theImplementationsection forAddExpenseCommand. - Finally, a success message is printed to the User.
4.15 Currency Converter Feature
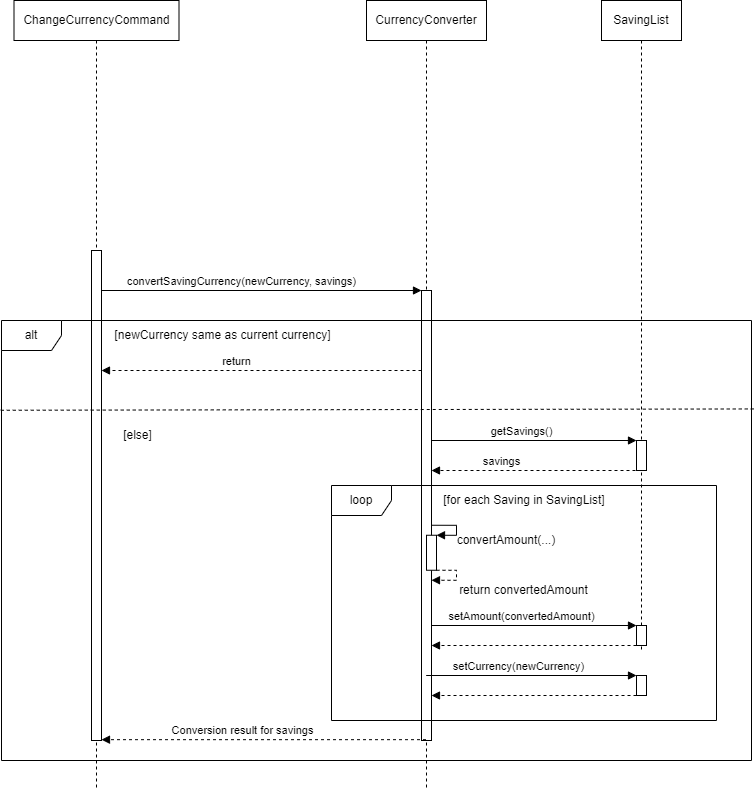
The Currency Converter Feature allows users to convert the currency of expenses and savings. This feature is facilitated by the ChangeCurrencyCommand class, initialized by the Parser class with CurrencyConverter, ExpenseList, and SavingList objects, alongside the newCurrency to convert to. The importance of these class attributes is as follows:
| Class Attribute | Variable Type | Relevance |
|---|---|---|
| currencyConverter | CurrencyConverter | The object responsible for currency conversion calculations |
| expenseList | ExpenseList | Contains the expenses whose currency will be converted |
| savingList | SavingList | Contains the savings whose currency will be converted |
| newCurrency | Currency | The new currency to which the amounts will be converted |
| exchangeRates | Map<Currency, Double> | Stores exchange rates with currencies as keys |
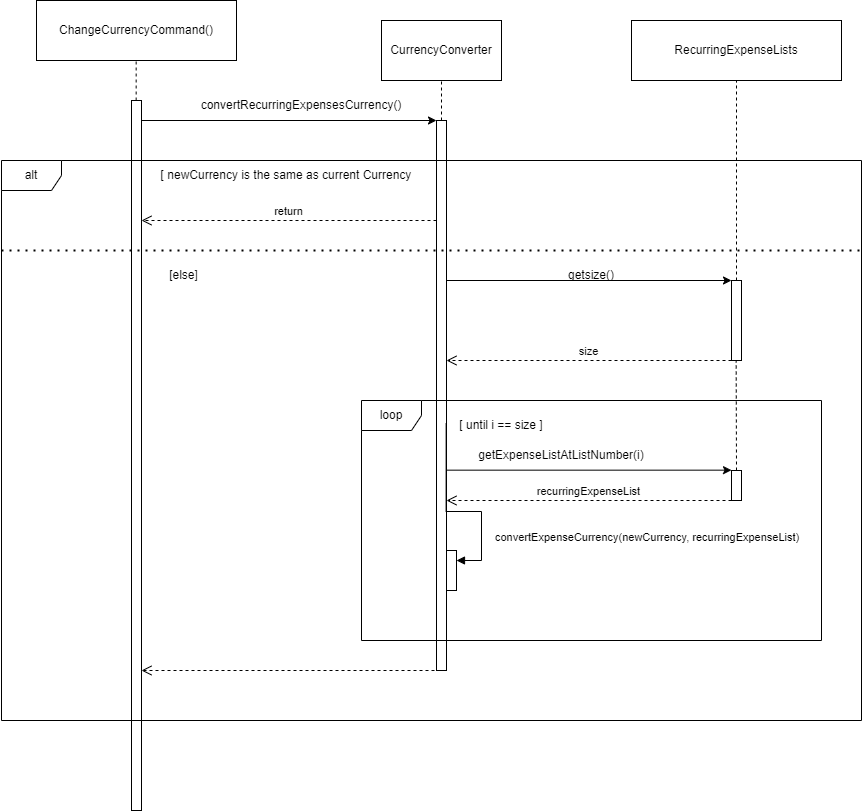
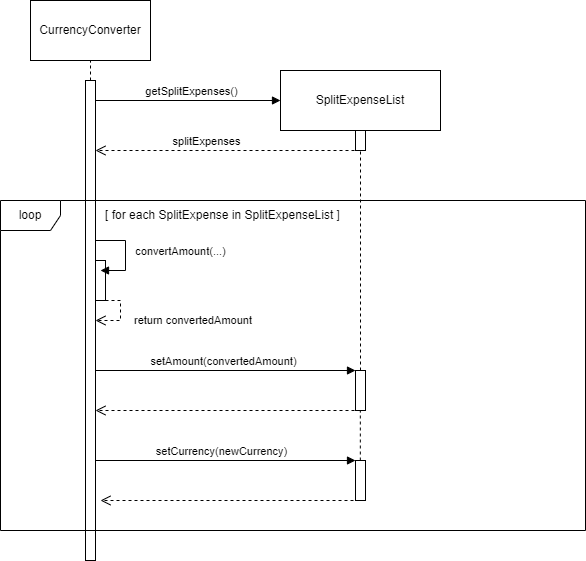
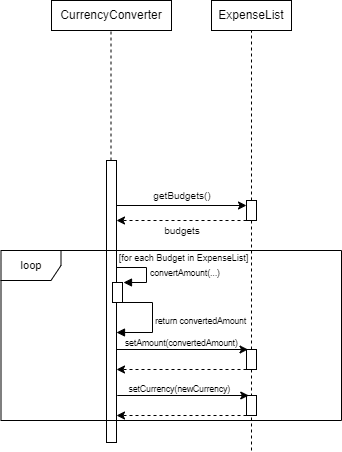
When BudgetBuddy calls command.execute(), ChangeCurrencyCommand employs the following methods from CurrencyConverter to convert the currency of all financial records:
| Method | Return Type | Relevance |
|---|---|---|
| convertExpenseCurrency() | void | Converts the currency of each Expense object to newCurrency |
| convertSavingCurrency() | void | Converts the currency of each Saving object to newCurrency |
| convertBudgetCurrency() | void | Converts the currency of each Budget object to newCurrency |
| convertRecurringExpensesCurrency() | void | Converts the currency of each Expense object in each ExpenseList object of the RecurringExpenseLists object to newCurrency |
| convertAmount() | double | Converts an amount from one currency to another using the exchange rates |
The Currency Converter feature also includes a mechanism for managing a default currency across the application, facilitated by the DefaultCurrency class. This enhancement allows for seamless conversion of financial records to a user-specified default currency.
-
convertAmount(double amount, Currency fromCurrency, Currency toCurrency): This method converts an amount from one currency to another using exchange rates stored in theexchangeRatesmap. It takes the original amount, the currency of the original amount (fromCurrency), and the target currency (toCurrency) as parameters and returns the converted amount. The method ensures that exchange rates are available for both currencies and that they are positive numbers. -
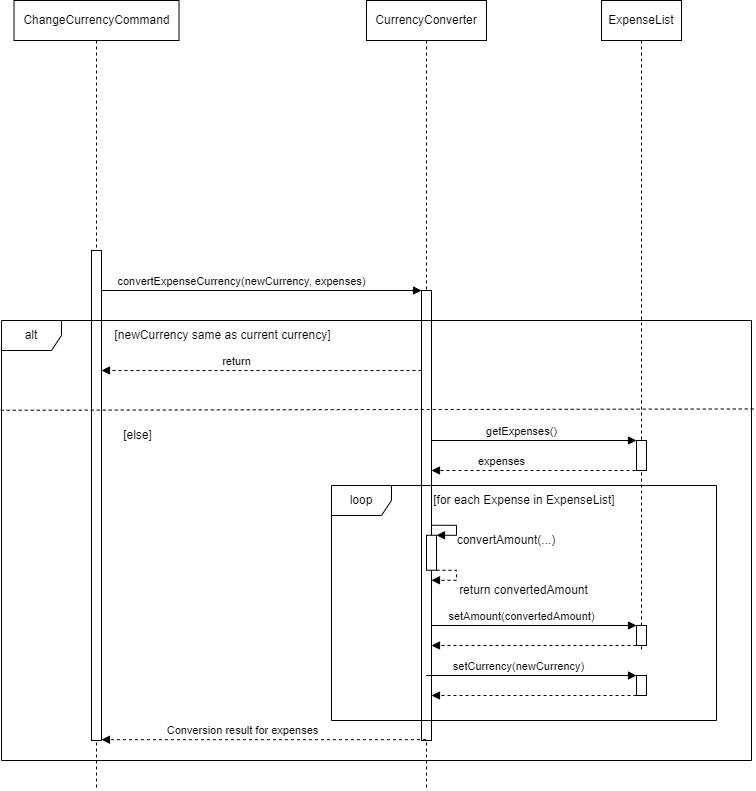
convertExpenseCurrency(Currency newCurrency, ExpenseList expenses): This method converts the currency of expenses in a givenExpenseListto a specified new currency (newCurrency). It iterates through the expenses in the list, converts each expense amount to the new currency using theconvertAmountmethod, and updates the expense amounts and currencies accordingly. -
convertSavingCurrency(Currency newCurrency, SavingList savings): Similar toconvertExpenseCurrency, this method converts the currency of savings in a givenSavingListto a specified new currency (newCurrency). It iterates through the savings in the list, converts each saving amount to the new currency using theconvertAmountmethod, and updates the saving amounts and currencies accordingly.
convertBudgetCurrency(Currency newCurrency, ExpenseList expenseList): This method is responsible for converting the currency of all budgets withinExpenseListto a specified new currency (newCurrency). It accepts the newCurrencyobject representing the target currency and theExpenseListcontaining the budgets, and updates the budget amounts and currencies accordingly.
convertRecurringExpensesCurrency(Currency newCurrency, RecurringExpenseLists recurringExpenseLists)This Method converts the currency of expenses of eachExpenseListwithinrecurringExpenseListsby continuously calling the methodconvertExpenseCurrencyfor eachExpenseList.
The DefaultCurrency class is designed to maintain and update the application-wide default currency setting. It provides static methods to get and set the default currency:
| Method | Return Type | Relevance |
|---|---|---|
| getDefaultCurrency | Currency | Retrieves the current default currency for the application |
| setDefaultCurrency | void | Updates the default currency to a new value |
Here’s the step-by-step process when the user uses the Currency Converter feature:
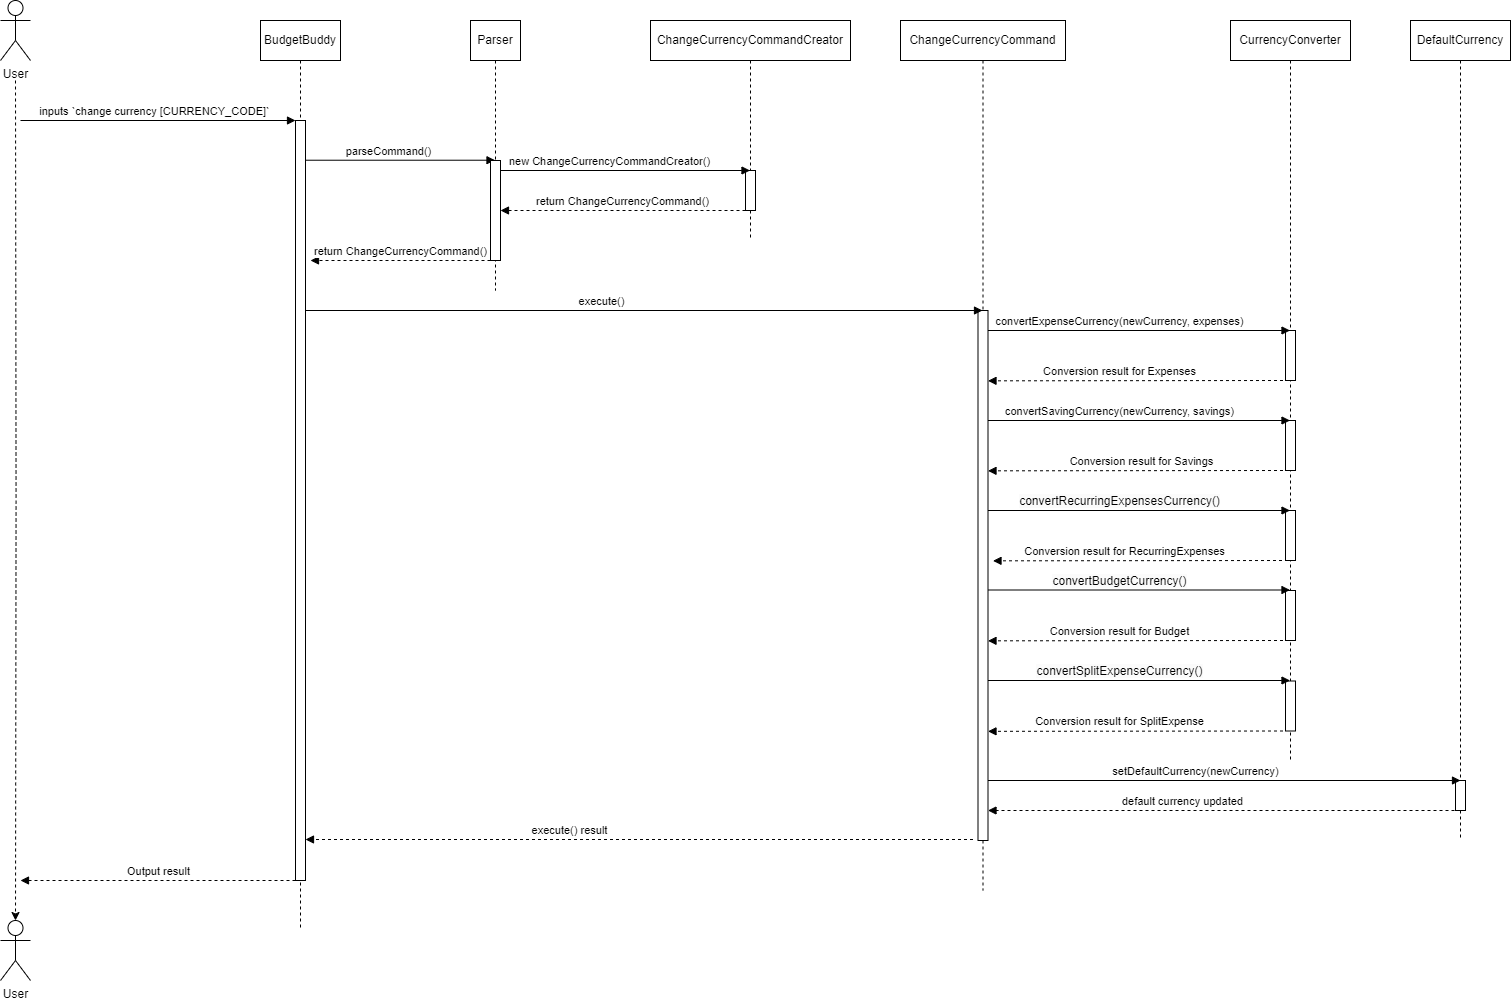
- The user inputs
change currency [newCurrencyCode].Parserprocesses this input and constructs aChangeCurrencyCommandobject with the necessary attributes. - The
ChangeCurrencyCommandobject is returned toBudgetBuddy, which callsChangeCurrencyCommand.execute(). execute()invokesCurrencyConverter.convertExpenseCurrency(newCurrency, expenseList)andCurrencyConverter.convertSavingCurrency(newCurrency, savingList).- Within the
convertExpenseCurrencyandconvertSavingCurrencycall, the amounts ofExpense,SavingorBudgetobjects are converted to thenewCurrencyusing theconvertAmountmethod. - The
DefaultCurrency.setDefaultCurrency(newCurrency)method is called to update the application’s default currency setting tonewCurrency. - The
setAmountandsetCurrencymethods ofExpenseListandSavingListare used to update the amounts and currency codes. - After successful conversion of savings, expenses and budgets, the default currency of the application is updated, reflecting the new choice across BudgetBuddy.
Sequence Diagram
The sequence diagram would be segmented into the different features that utilises the CurrencyConverter class.
Main Sequence Diagram before Execution:
Upon execution, the following respective conversion functions will run:
Sequence Diagram for convertExpenseCurrency():
Sequence Diagram for convertSavingCurrency():
Sequence Diagram for convertRecurringExpensesCurrency():
Sequence Diagram for convertSplittedExpenseCurrency():
Sequence Diagram for convertBudgetCurrency():
4.16 Setting Budget Feature
The Budget Management feature allows users to set financial limits for the various categories and monitor their spending. This feature’s objective is to give users the ability to stay within their financial goals and avoid overspending.
This feature is orchestrated by ListBudgetCommand and SetBudgetCommand, which are initialised by the Parser
class. Below is a description of the key class attributes and methods involved in the budget setting and listing
process:
Class Attributes for SetBudgetCommand:
| Class Attribute | Variable Type | Relevance |
|---|---|---|
| expenseList | ExpenseList | Object containing the list of expenses to check against set budgets |
| category | String | The category for which the budget is being set |
| budget | double | The budget amount to be set for the category |
The UML Sequence diagram below illustrates the execution flow of the Set Budget Feature when a user inputs a valid command to set a budget:
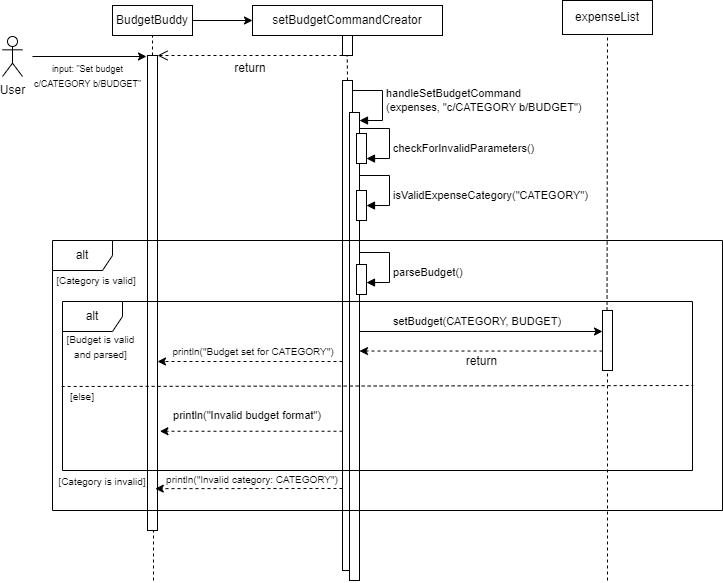
The sequence of operations for an example input, set budget c/Transport b/500, is as follows:
- BudgetBuddy receives the user input and utilizes the Parser to decipher it.
- The Parser identifies the key components of the input (category and budget) and constructs a SetBudgetCommand object with the identified category (Transport) and budget (500).
- The Parser then hands over the SetBudgetCommand object to BudgetBuddy.
- BudgetBuddy invokes the execute() method on the SetBudgetCommand object.
- The SetBudgetCommand object calls the setBudget() method on the ExpenseList, passing in the category and budget amount.
- The ExpenseList updates or creates a budget allocation for the specified category with the provided amount.
- A confirmation message is displayed in the console indicating the budget has been successfully set or updated.
Class Attributes for ListBudgetCommand:
| Class Attribute | Variable Type | Relevance |
|---|---|---|
| expenseList | ExpenseList | Object containing the list of expenses to check against set budgets |
The UML Sequence diagram below illustrates the execution flow of the Set Budget Feature when a user inputs a valid command to list budgets:
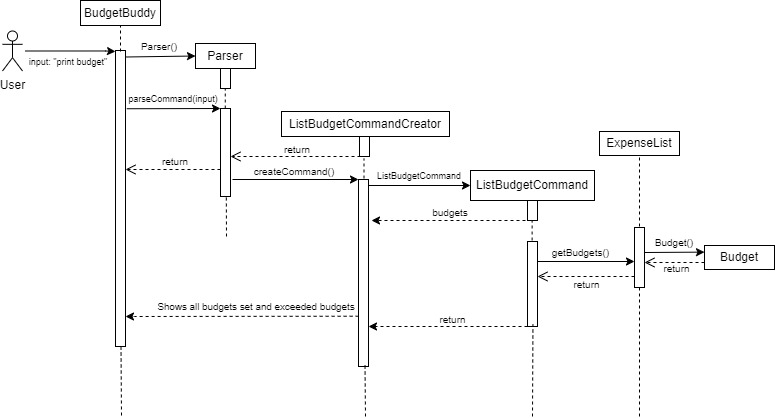
Upon the call of the execute() method in BudgetBuddy using command.execute(), SetBudgetCommand will update the
budget in ExpenseList using setBudget. Similarly, ListBudgetCommand will fetch and display all categories with
their budgets using getBudgets, and highlight those that are above the set budget.
Key Methods used from ExpenseList
| Method | Return Type | Relevance |
|---|---|---|
| setBudget(category, budget) | void | Sets or updates the budget for a given category in the ExpenseList |
| getBudgets() | List |
Retrieves the list of all budgets set |
The ListBudgetCommand’s updated execution function now features an improved display that not only shows the budget,
spent amount, and remaining balance but also clearly indicates when the budget has been exceeded. If the expenses
surpass the budget, instead of showing a negative remaining balance, it displays “Exceeded”, providing a straightforward
and immediate visual cue that the budget limits have been surpassed.
The “Categories above budget” section offers a concise table summarizing which categories have gone over the budget and by what amount, making it easy for users to identify areas of concern.
4.17 Get Expense Insights Feature
The Get Expense Insights feature allows users to analyze their spending patterns and understand where their money goes.
This feature is managed by the GetExpenseInsightsCommand class, which is initialized by the Parser class.
The GetExpenseInsightsCommand holds an ExpenseList object which contains all expenses added by the user.
The relevance of this Class Attribute in GetExpenseInsightsCommand is as follows:
| Class Attribute | Variable Type | Relevance |
|---|---|---|
| expenseList | ExpenseList | ExpenseList object containing the list of expenses to be analyzed |
Upon invocation of the execute() method in BudgetBuddy, the GetExpenseInsightsCommand leverages methods from the
ExpenseList class to calculate and display spending insights.
| Method | Return Type | Relevance |
|---|---|---|
| getExpenseInsights | void | Analyzes expenses and prints insights on spending distribution, highest and lowest spending |
The following UML Sequence diagram illustrates the execution process of the Get Expenses Insights Command when a user enters a valid command:
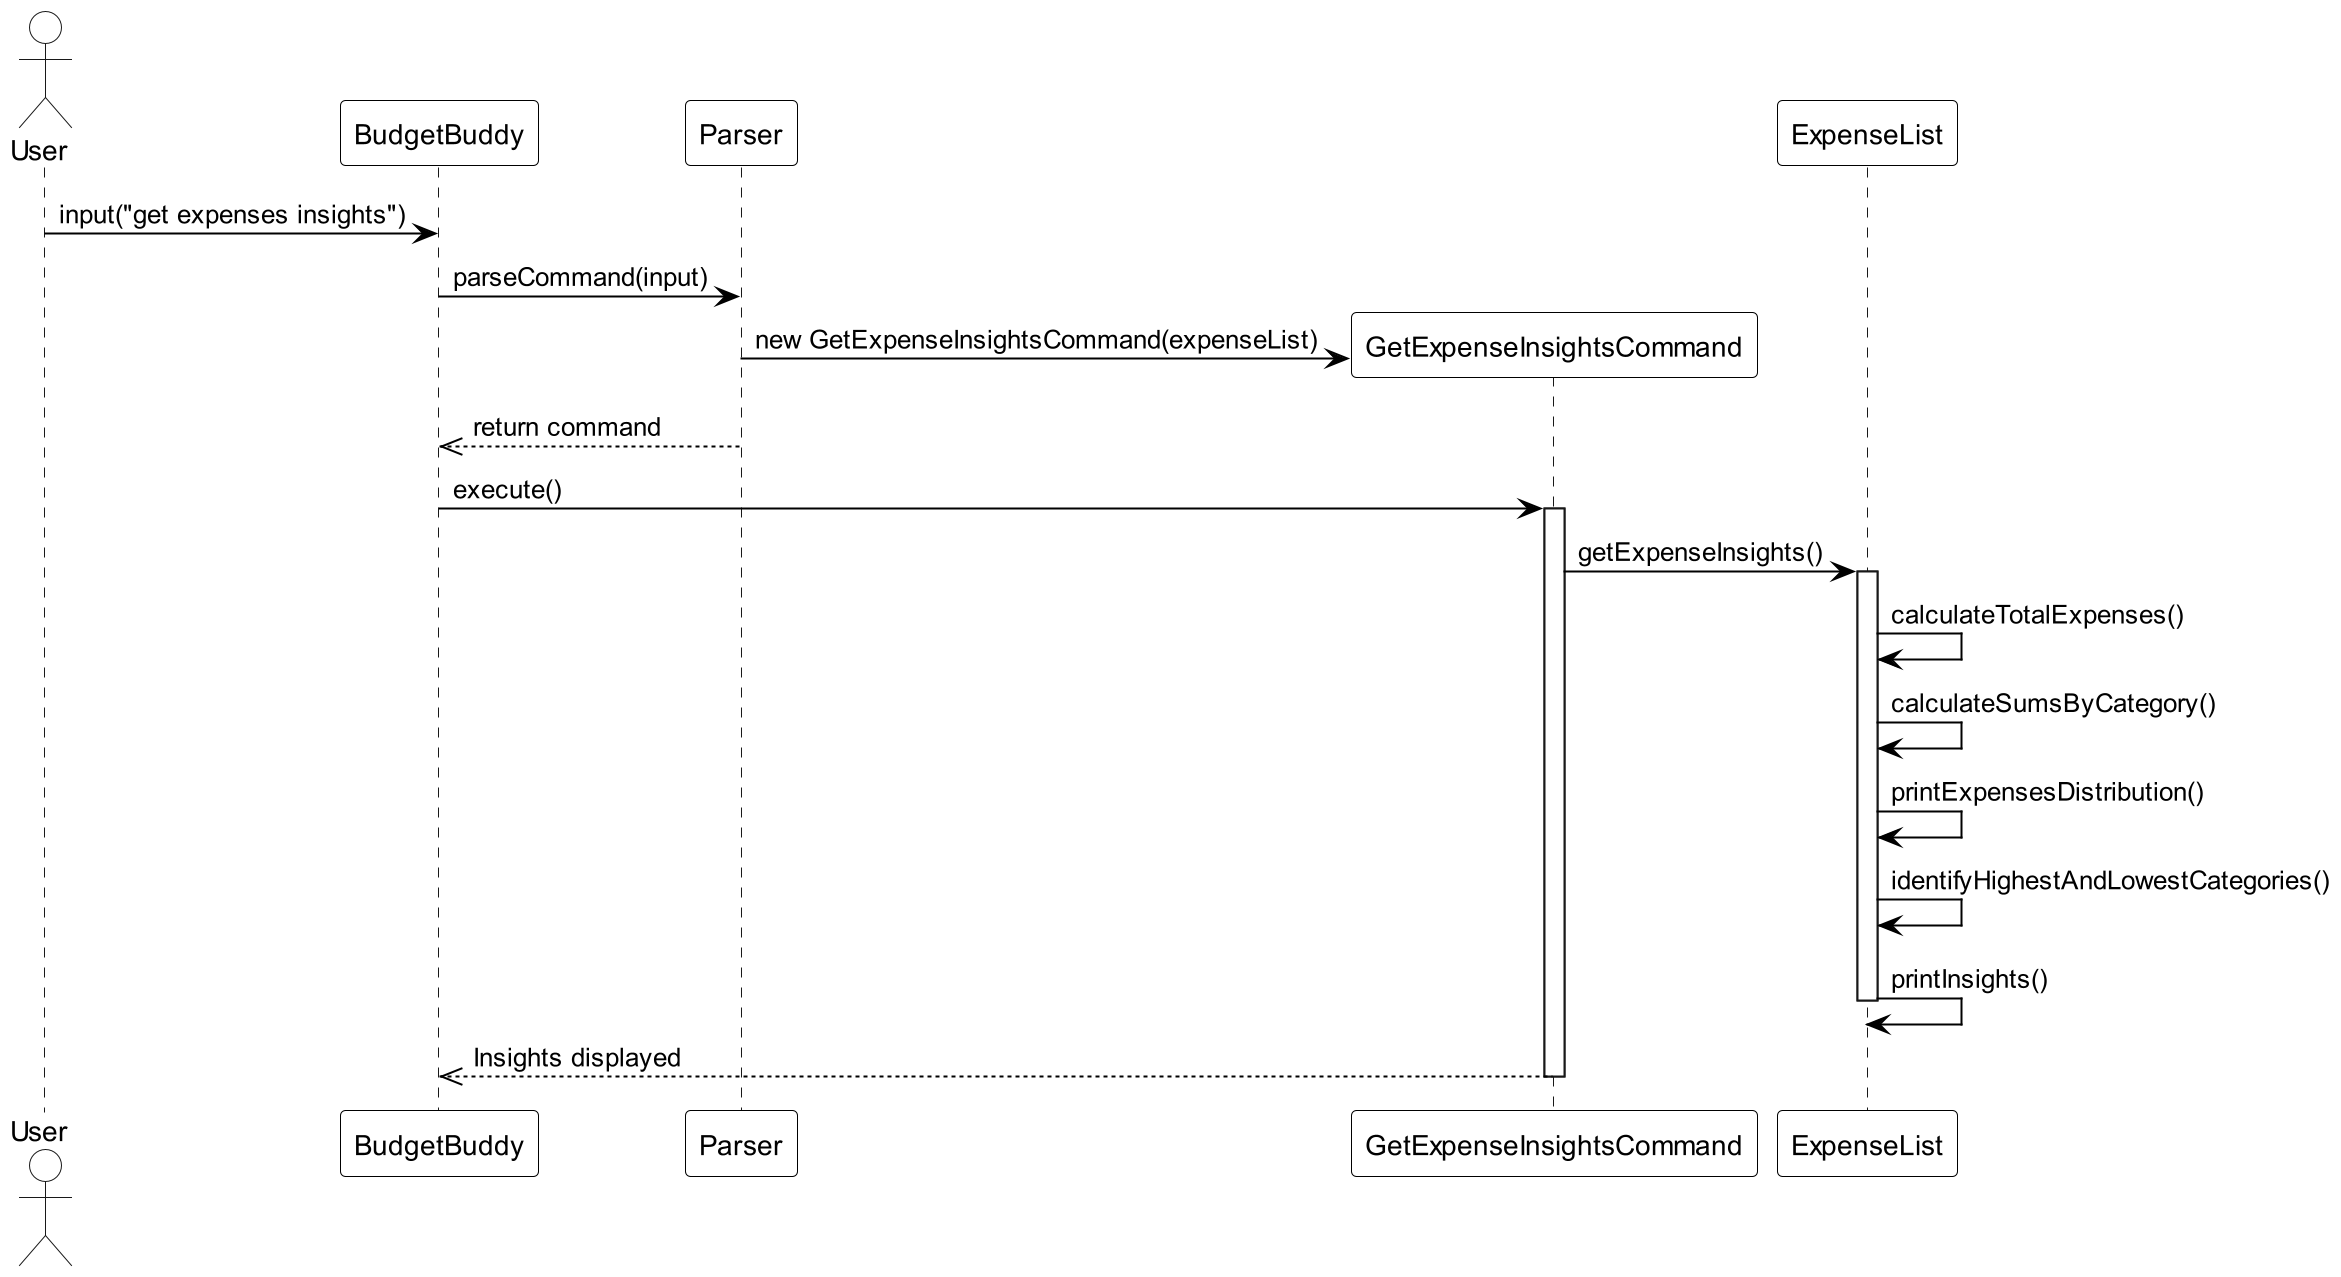
Here’s a step-by-step explanation of the processes that occur when a user invokes the Get Expense Insights feature:
- The BudgetBuddy application receives the command
get expenses insightsand passes it to theParser. - The
Parserinterprets the input and creates a newGetExpenseInsightsCommandobject with theExpenseList. - The
BudgetBuddyapplication then callsexecute()on theGetExpenseInsightsCommandobject. - The
GetExpenseInsightsCommandobject calls thegetExpenseInsightsmethod on theExpenseList. - The
ExpenseListanalyzes the expenses, calculating total spendings, average amount, and categorizing the expenses. - Insights such as the categories with the highest and lowest spending are then printed to the user.
4.18 Get Savings Insights Feature
The Get Savings Insights feature enables users to analyze their savings distribution across various categories and
understand their saving habits. This feature is facilitated by the GetSavingsInsightsCommand class, which is
instantiated by the Parser class. In this class, a SavingList object is maintained, which contains all the savings
added by the user. The significance of the class attribute in GetSavingsInsightsCommand is as detailed below:
| Class Attribute | Variable Type | Relevance |
|---|---|---|
| savingList | SavingList | SavingList object containing the list of savings to be scrutinized. |
When the execute() method in BudgetBuddy is invoked via command.execute(), the GetSavingsInsightsCommand
leverages methods from the SavingList class to calculate and exhibit insights about savings.
| Method | Return Type | Relevance |
|---|---|---|
| getSavingsInsights() | void | Analyzes savings and displays insights on savings distribution, highest and lowest savings, etc. |
The following UML Sequence diagram illustrates the execution process of the Get Savings Insights Command when a user enters a valid command:
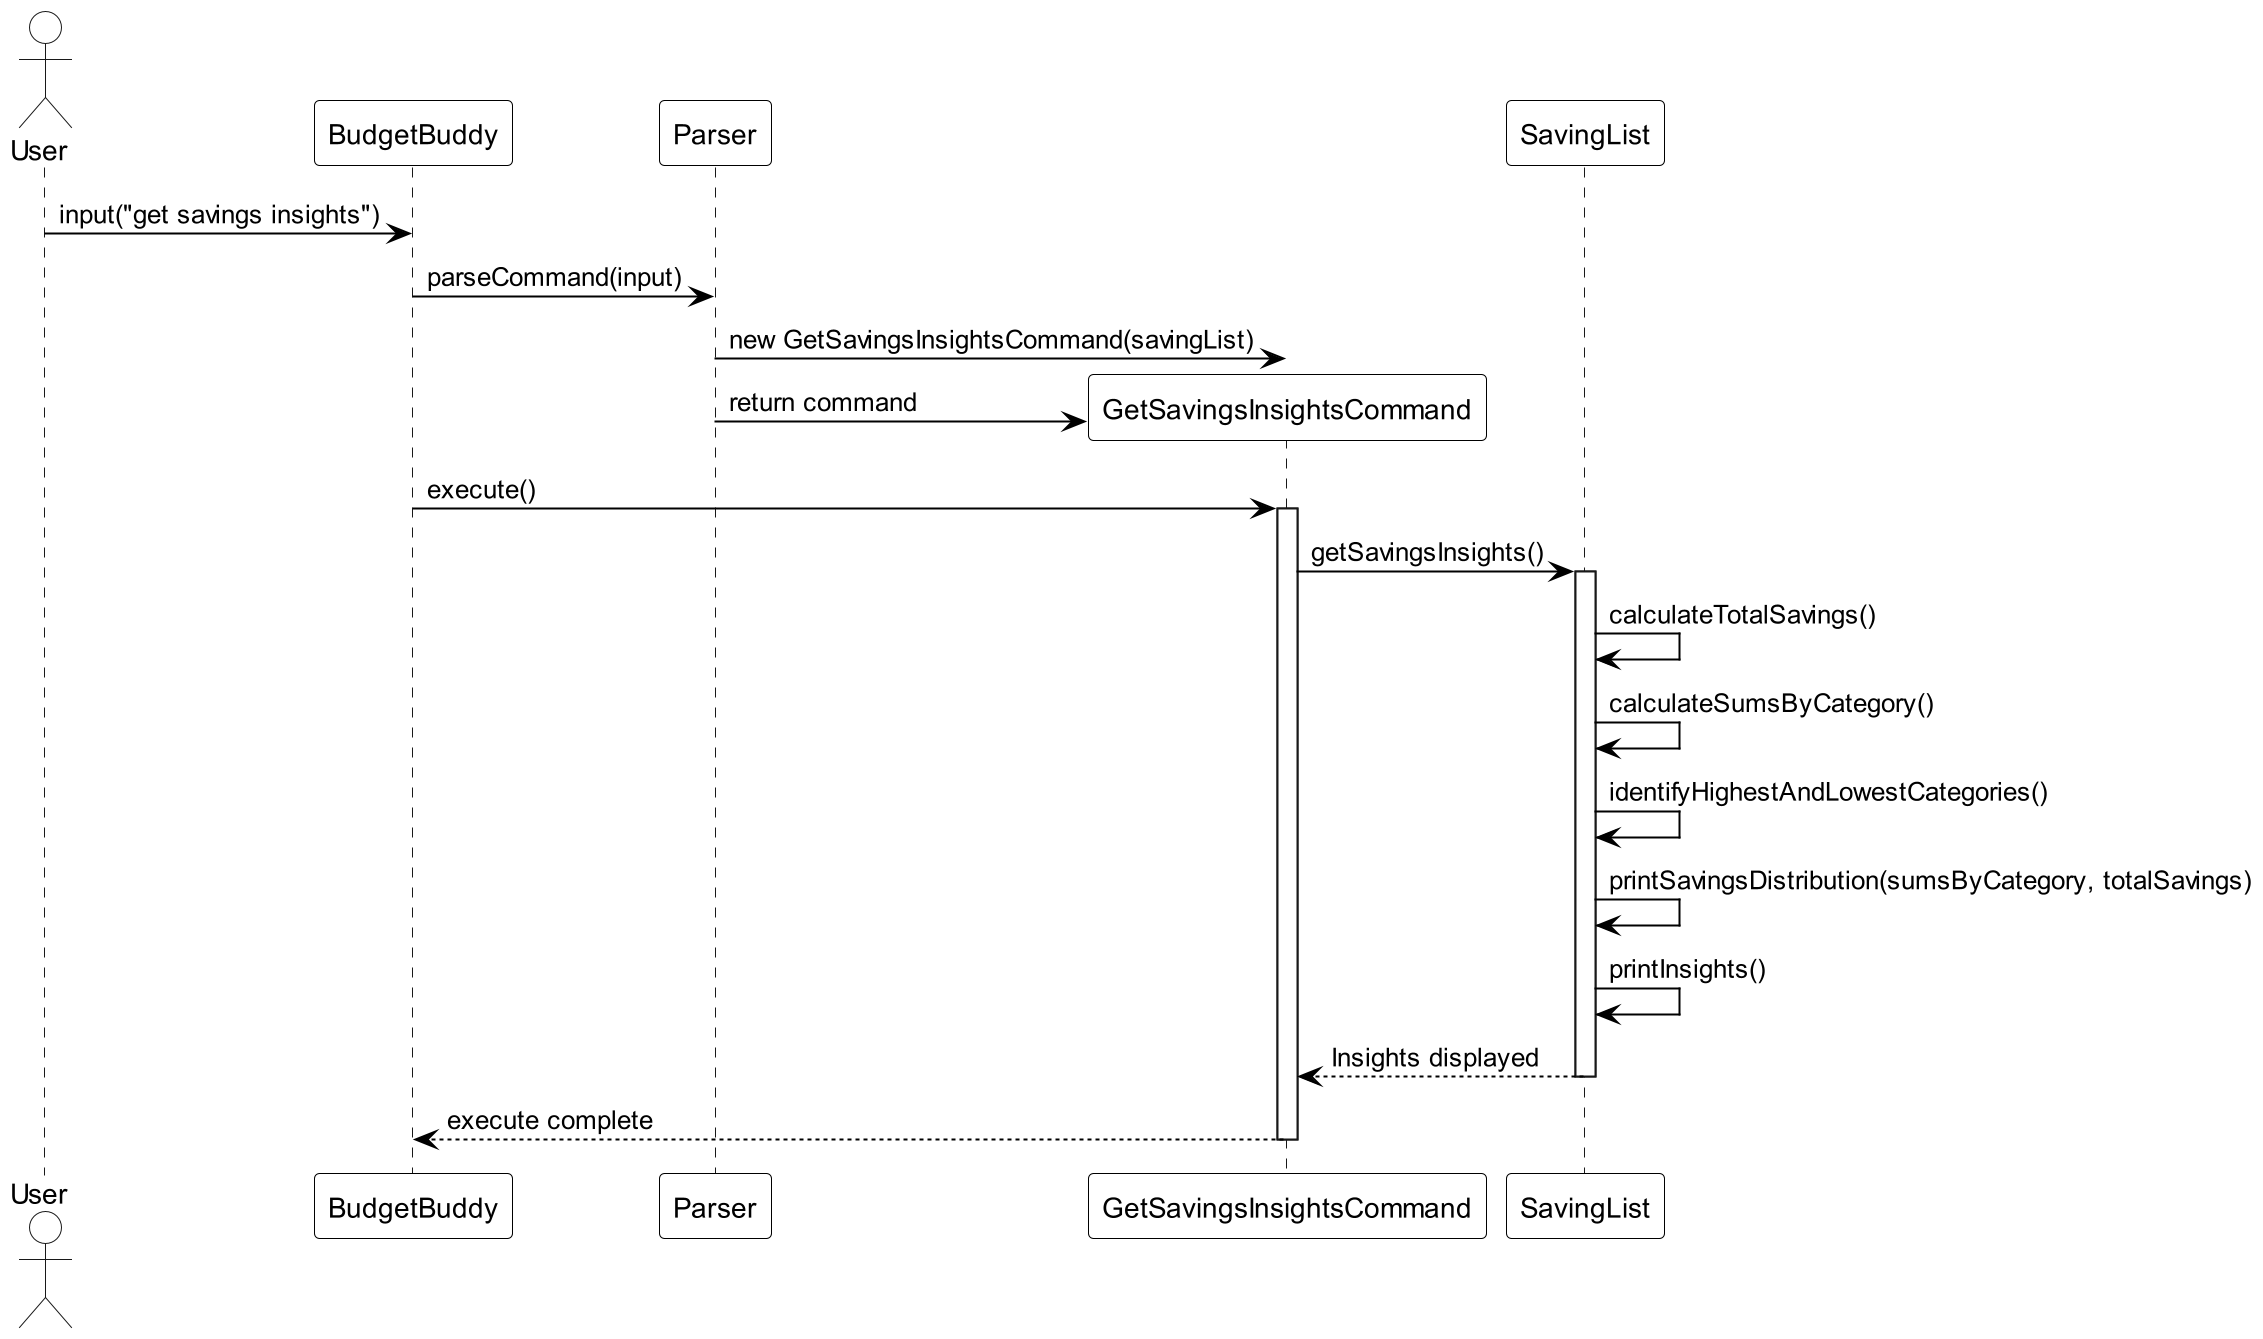
The sequential flow of execution when a user commands to get savings insights is as follows:
- The user inputs the command ‘get savings insights’ and
BudgetBuddycaptures it. BudgetBuddyemploysParserto decode the input.Parserconstructs a newGetSavingsInsightsCommandobject with theSavingList.Parsersends thisGetSavingsInsightsCommandobject back toBudgetBuddy.BudgetBuddycalls theexecute()method on theGetSavingsInsightsCommandobject.GetSavingsInsightsCommandinvokes thegetSavingsInsights()method from theSavingList.SavingListcomputes and prints the insights, such as the categories with the highest and lowest savings and the overall distribution.- The insights are shown to the user.
5. Documentation
The following section describes how documentation for the project was written. Documentation Format follows GitHub-Flavoured Markdown.
5.1 Documentation Style
- We followed the style similar to the example provided here.
5.2 Diagrams
- We use Draw.io for our diagrams, exported as PNG with light theme.
5.3 PDF Conversion
- We use Chrome for converting documentations to PDF format as per recommendations here.
6. Testing
The following section describes the testing methodologies followed in this project to ensure the project is of the highest standard and as bug-free as possible.
6.1 Running Tests
JUnit tests have been added to the project, which can be found under src/test. These JUnit tests aid in testing the respective commands and features against
both valid and invalid inputs. To run these tests, on IntelliJ IDE, simply
right-click the test folder followed by More Run/Debug -> Run Tests with Coverage. This would run all the pre-defined tests, and also display the
coverage for each file of the main application.
6.2 Logger
A Global Logger is utilized in certain methods and features which are more prone to errors, etc., methods that may potentially deal with invalid inputs. In the releases, this Logger is disabled using the command
Logger.getLogger(Logger.GLOBAL_LOGGER_NAME).setLevel(Level.OFF); before run() is called in BudgetBuddy#main() . However, in the code files, the Logger is still enabled and aids in tracing the code when testing for errors.
Appendix A: Product scope
Target user profile
This product is for users who can type fast, and wishes to handle and track their current and future expenses on a singular platform.
Value proposition
BudgetBuddy is faster and more efficient way to track and calculate current and future expenses if a user is able to type fast. It also provides the ability to deal with finances on a singular platform.
Appendix B: User Stories
User Stories
| Version | As a … | I want to … | So that I can … |
|---|---|---|---|
| v1.0 | user | be able to view my expenses | track my prior expenditures and plan future expenses accordingly |
| v1.0 | user | be able to view my savings | plan my budget accordingly |
| v1.0 | user | be able to view my expenses by their relevant categories | control my spending |
| v1.0 | user | be able to identify my largest savings category | allocate necessary saved funds |
| v1.0 | user | add expenses | track my spending |
| v1.0 | user | Categorise my expenses | manage my finances more efficiently |
| v1.0 | user | Edit or delete expenses | remove any incorrectly added items |
| v1.0 | user | allocate saved funds | know how much I will have left after expenses |
| v1.0 | user | be able to find expenses by description | know the expenses i have that is associated with the description |
| v1.0 | user | be able to find expenses more than a certain amount | know what my deemed larger expenses are |
| v1.0 | user | be able to find expenses less than a certain amount | know what my deemed lower expenses are |
| v1.0 | User | See what commands i can use | I know how to use the application |
| v2.0 | user | Plan my budget | Avoid overspending |
| v2.0 | frequent traveler | log my expenses in multiple currencies | accurately track my expenses across different countries |
| v2.0 | user | add multiple expenses at once | Add common expenditures i have monthly at one shot |
| v2.0 | user | have multiple lists of recurring expenses | separate associated recurring expenses together |
| v2.0 | user | view what expenses i have in each of my recurring expenses list | know what expenses i have put into each list |
| v2.0 | user | remove a list from my recurring expenses list | remove underutilized lists or wrongly added lists |
| v2.0 | user | save my expenses | make sure i do not have to retype all expenses again after closing the application |
| v2.0 | user | load my expenses | i can access previously added expenses when i reopen the application |
| v2.0 | user | save my expenses in my recurring expenses | make sure i do not have to retype all expenses again after closing the application |
| v2.0 | user | load my expenses in my recurring expenses | i can access previously added expenses in my recurring expenses when i reopen the application |
| v2.0 | user | divide bills that are meant for splitting | know how much others should pay me |
| v2.0 | user | settle bills that others have repaid me | see which bills have not been settled |
| v2.0 | user | view my expenses in a graphical representation | to analyse my highest and lowest expense categories |
| v2.0 | user | view my savings in a graphical representation | to analyse my highest and lowest saving categories |
Appendix C: Use Cases
(For all use cases below, the System is BudgetBuddy and the Actor is the user, unless specified otherwise).
Use Case: Listing Savings
- User requests to list savings.
- BudgetBuddy retrieves the stored savings and expenses.
- BudgetBuddy calculates the remaining savings left.
- BudgetBuddy displays the existing savings along with the initial savings amount and remaining savings left.
Extensions
- 1.1 User requests to list savings by a specific category.
- 1.1.1 BudgetBuddy retrieves the stored savings and expenses.
- 1.1.2 BudgetBuddy calculates remaining savings left.
- 1.1.3 BudgetBuddy displays only the existing savings with the filtered category.
- 1.1.4 BudgetBuddy displays the overall initial savings and remaining savings left.
Use case ends
- 1.2 The user entered an invalid category.
- 1.2.1 BudgetBuddy shows an error message.
Use case ends
- 1.2.1 BudgetBuddy shows an error message.
- 2.1 BudgetBuddy retrieves an empty savings list but existing expenses list.
- 2.1.1 BudgetBuddy calculates savings required to pay off expenses.
- 2.1.2 BudgetBuddy displays savings user is short of.
Use case ends
- 2.2 BudgetBuddy retrieves an existing savings list but an empty expenses list.
- 2.2.1 BudgetBuddy displays all existing entries in savings list.
- 2.2.2 BudgetBuddy still calculates remaining savings left, with 0 expenses deducted.
- 2.2.3 BudgetBuddy displays overall initial savings and remaining savings left.
Use case ends
- 2.3 BudgetBuddy retrieves both empty savings and expenses list.
- 2.3.1 BudgetBuddy displays an empty list for both savings and expenses.
Use case ends
- 2.3.1 BudgetBuddy displays an empty list for both savings and expenses.
Use Case: Listing Expenses
- User requests to list expenses.
- BudgetBuddy retrieves stored expenses.
- BudgetBuddy calculates total overall expenses.
- BudgetBuddy displays existing expenses along with the overall total expenses.
Extensions
- 1.1 User requests to list expenses by a specific category.
- 1.1.1 BudgetBuddy retrieves stored expenses.
- 1.1.2 BudgetBuddy calculates total overall expenses.
- 1.1.3 BudgetBuddy displays only the existing expenses with the filtered category, along with overall total expenses.
Use case ends
- 1.2 User entered an invalid category.
- 1.2.1 BudgetBuddy shows an error message.
Use case ends
- 1.2.1 BudgetBuddy shows an error message.
- 2.1 BudgetBuddy retrieves an empty expense list.
- 2.1.1 BudgetBuddy displays an empty expense list.
Use case ends
- 2.1.1 BudgetBuddy displays an empty expense list.
Use Case: Edit Savings
- User requests to edit a savings entry by specifying the category of the saving.
- BudgetBuddy prompts the user for the category and amount.
- BudgetBuddy validates the provided category and updates the savings entry if the category is valid.
- BudgetBuddy displays a confirmation message indicating the savings entry has been updated.
Extensions
- 1.1 User specifies an category that does not exist.
- 1.1.1 BudgetBuddy displays an error message indicating the category is invalid. Use case ends.
- 1.2 User enters an invalid or non-numeric amount.
- 1.2.1 BudgetBuddy shows an error message and prompts the user to enter a valid numerical amount. Use case ends.
- 1.3 User attempts to update savings with a negative amount.
- 1.3.1 BudgetBuddy displays an error message indicating the savings amount must be positive. Use case ends.
Use Case: Edit Expenses
- User requests to edit an expense entry by specifying the index of the expense and the details to be updated.
- BudgetBuddy prompts the user for the category, amount, and description for the expense.
- BudgetBuddy checks if the expense index provided is valid.
- If valid, BudgetBuddy updates the expense entry with the new details.
- BudgetBuddy displays a confirmation message indicating the expense entry has been updated.
Extensions
- 1.1 User specifies an index that does not exist in the expense list.
- 1.1.1 BudgetBuddy displays an error message indicating the index is out of bounds. Use case ends.
- 1.2 User enters an invalid or non-numeric amount for the expense.
- 1.2.1 BudgetBuddy shows an error message and prompts the user to enter a valid numerical amount. Use case ends.
- 1.3 User enters a negative number for the expense amount.
- 1.3.1 BudgetBuddy displays an error message indicating the expense amount must be positive. Use case ends.
Use Case: Currency Converter
- User requests to change currency.
- BudgetBuddy converts existing amounts in lists to new currency.
- BudgetBuddy sets default currency to the new changed currency.
- BudgetBuddy displays currency changed.
Extensions
- 1.1 User inputs an invalid currency code.
- 1.1.1 BudgetBuddy shows an error message.
Use case ends
- 1.1.1 BudgetBuddy shows an error message.
- 1.2 User inputs the same currency code.
- 1.2.1 BudgetBuddy notifies user of the same conversion.
Use case ends
- 1.2.1 BudgetBuddy notifies user of the same conversion.
Use Case: Delete expenses
- User requests to delete a specific expense by specifying the index
- BudgetBuddy retrieves the specified expense from the stored expenses list.
- BudgetBuddy deletes the specified expense.
- BudgetBuddy displays a confirmation message indicating the expense has been deleted.
Extensions
- 1.1 User specifies an invalid or out-of-bounds index
- 1.1.1 BudgetBuddy shows an error message and prompts the user to enter a valid index.
Use case ends.
- 1.1.1 BudgetBuddy shows an error message and prompts the user to enter a valid index.
- 2.1 BudgetBuddy retrieves an empty expense list
- 2.1.1 BudgetBuddy displays an error message indicating there are no expenses to delete.
Use case ends.
- 2.1.1 BudgetBuddy displays an error message indicating there are no expenses to delete.
Use Case: Reduce Savings
- User requests to reduce savings by specifying a category and amount.
- BudgetBuddy retrieves savings associated with the specified category.
- BudgetBuddy reduces the savings by the specified amount.
- BudgetBuddy displays a confirmation message indicating the savings have been reduced.
Extensions
- 1.1 User specifies a category not present in the savings list.
- 1.1.1 BudgetBuddy shows an error message indicating the category does not exist.
Use case ends.
- 1.1.1 BudgetBuddy shows an error message indicating the category does not exist.
- 1.2 User specifies an amount that exceeds the available savings in the category.
- 1.2.1 BudgetBuddy shows an error message indicating insufficient savings for the reduction.
Use case ends.
- 1.2.1 BudgetBuddy shows an error message indicating insufficient savings for the reduction.
- 2.1 BudgetBuddy retrieves an empty savings list.
- 2.1.1 BudgetBuddy displays an error message indicating there are no savings to reduce.
Use case ends.
- 2.1.1 BudgetBuddy displays an error message indicating there are no savings to reduce.
Use Case: Listing Budget
- User requests to list budgets.
- BudgetBuddy retrieves all set budgets along with their associated categories.
- BudgetBuddy displays each category with its corresponding budget limit.
- BudgetBuddy also displays the total of all budgets combined.
Extensions
- 2.1 BudgetBuddy retrieves an empty budget list.
- 2.1.1 BudgetBuddy displays a message indicating no budgets have been set.
Use case ends.
- 2.1.1 BudgetBuddy displays a message indicating no budgets have been set.
Use Case: Setting Budget
- User requests to set a budget for a specific category by specifying the category and the budget amount.
- BudgetBuddy checks if the category exists; if not, it adds the category.
- BudgetBuddy sets or updates the budget for the specified category.
- BudgetBuddy displays a confirmation message indicating the budget has been set or updated.
Extensions
- 1.1 User specifies an invalid or non-numeric budget amount.
- 1.1.1 BudgetBuddy shows an error message and prompts the user to enter a valid numerical amount.
Use case ends.
- 1.1.1 BudgetBuddy shows an error message and prompts the user to enter a valid numerical amount.
- 1.2 User sets a budget amount to zero or a negative number.
- 1.2.1 BudgetBuddy shows an error message indicating the budget amount must be positive.
Use case ends.
- 1.2.1 BudgetBuddy shows an error message indicating the budget amount must be positive.
Use Case : Add a Recurring Expense List
- User requests to add a recurring expense list with a specific name
- BudgetBuddy creates a recurring expense list with the specified name
- use case ends.
Extensions
- 1a. Name is Empty
- 1a1. BudgetBuddy shows an error message
- use case ends
- 1a1. BudgetBuddy shows an error message
Use Case : List all recurring expense lists
- User requests to list all recurring expense lists
- BudgetBuddy shows all lists of recurring expense list.
- use case ends
Extensions
- 1a. The list of all recurring expense lists is empty
- 1a1. BudgetBuddy states that no recurring expense lists has been added yet
- use case ends
- 1a1. BudgetBuddy states that no recurring expense lists has been added yet
Use Case : Remove a recurring expense list
- User requests to list all recurring expense lists
- BudgetBuddy shows all lists of recurring expense list
- User Requests to delete a specific list
- BudgetBuddy deletes the list
- use case ends
Extensions
- 2a. The list is empty
- use case ends
- 3a. The given index is invalid
- 3a.1 BudgetBuddy shows an error message
- use case resumes at step 2
- 3a.1 BudgetBuddy shows an error message
Use Case : Add an expense to a Recurring Expense List
- User requests to list all recurring expense lists
- BudgetBuddy shows all lists of recurring expense list.
- User requests to add an expense to a specific list
- BudgetBuddy adds the expense to the list
- use case ends
Extensions
- 2a. The list is empty
- use case ends
- 3a. The given index is invalid
- 3a1. BudgetBuddy shows an error message
- use case resumes at step 2
- 3a1. BudgetBuddy shows an error message
- 3b. The given category is invalid
- 3b1. BudgetBuddy shows an error message
- use case resumes at step 2
- 3b1. BudgetBuddy shows an error message
- 3c. The given amount is invalid
- 3c1. BudgetBuddy shows an error message
- use case resumes at step 2
- 3c1. BudgetBuddy shows an error message
- 3d. The given description is invalid
- 3d1. BudgetBuddy shows an error message
- use case resumes at step 2
- 3d1. BudgetBuddy shows an error message
Use Case : List all expenses in a recurring expense list
- User requests to list all recurring expense lists
- BudgetBuddy shows all lists of recurring expense list
- User requests to view all expenses in a specific list
- BudgetBuddy shows all expenses in the specific list
- use case ends
Extensions
- 2a. The list is empty
- use case ends
- 3a. The index is invalid
- 3a1. BudgetBuddy shows an error message
- use case resumes at step 2
- 3a1. BudgetBuddy shows an error message
- 3b. The list at index is empty
- 3b1. BudgetBuddy shows no expenses
- use case ends
- 3b1. BudgetBuddy shows no expenses
Use Case : Add all expenses in a recurring expense list to the overall expenses
- User requests to list all recurring expense lists
- BudgetBuddy shows all lists of recurring expense list
- User requests to add all expenses in a specific list to the overall expenses
- BudgetBuddy adds all expenses in the specific list to the overall expenses
- use case ends
Extensions
- 2a. The list is empty
- use case ends
- 3a. The index is invalid
- 3a1. BudgetBuddy shows an error message
- use case resumes at step 2
- 3a1. BudgetBuddy shows an error message
- 3b. The list at index is empty
- 3b1. BuddyBuddy shows message stating nothing is added to overall expenses
- use case ends
- 3b1. BuddyBuddy shows message stating nothing is added to overall expenses
Use Case: Get Expenses Insights
- User requests to get insights into their expenses.
- BudgetBuddy retrieves all expenses from the ExpenseList.
- BudgetBuddy calculates and displays insights, including highest and lowest expense categories, and categories with no expenses.
- BudgetBuddy displays a visual representation of expense distribution across different categories.
Extensions
- 1.1 ExpenseList is empty.
- 1.1.1 BudgetBuddy displays a message indicating no expense data is available to analyze. Use case ends.
Use Case: Get Savings Insights
- User requests to get insights into their savings.
- BudgetBuddy retrieves all savings from the SavingList.
- BudgetBuddy calculates and displays insights, such as highest and lowest savings categories, and categories with no savings.
- BudgetBuddy displays a visual representation of savings distribution across different categories.
Extensions
- 1.1 SavingList is empty.
- 1.1.1 BudgetBuddy displays a message indicating no savings data is available to analyze. Use case ends.
Appendix D: Non-Functional Requirements
- Should work on any mainstream OS as long as it has Java
11or above installed. - Should be able to hold up to 1000 entries without a noticeable sluggishness in performance for typical usage.
- A user with above average typing speed for regular English text should be able to accomplish most of the tasks faster using commands than using the mouse.
Appendix E: Glossary
- Mainstream OS: Windows, Linux, macOS.
- Recurring Expenses: A set of expenses which can be added to the overall expenses at any given point in time
- Overall Expenses: Refers to the overall expense list. Etc, the expense list which expenses get added to when performing an add expense command.
Appendix F: Instructions for manual testing
1. Launch and Shutdown
- 1.1 Initial Launch
- Download the
jarfile and copy into an empty folder. - Navigate to the
jarfile via a Terminal/PowerShell window. - Start the
jarfile with the following command:java -jar BudgetBuddy.jar - Expected: Command Line Interface should launch with the Menu being shown.
- Download the
2. Test Cases
2.1 Displaying Commands
- Test Case :
menu
Expected : Prints all possible menu items in the command line interface - Test Case :
menu 1
Expected : Prints all commands related to Manage Expenses` in the command line interface - Test Case :
menu string
Expected : An error message is printed in the command line interface - Test Case :
menu 999
Expected : An error message is printed in the command line interface
2.2 Adding Expenses
- 2.2.1 Adding an Expense
- Prerequisites: None.
- Test Case:
add expense c/Transport a/50 d/Bus fare - Expected: Adds an expense with category
Transport, amount $50, and descriptionBus fare. Confirmation message will be printed in the command line interface.
- 2.2.2 Adding an Expense with Incomplete Information
- Prerequisites: None.
- Test Case:
add expense c/Transport a/-50 d/Bus Fare - Expected: Error message due to negative number input. Command line interface will instruct on correct format.
- 2.2.3 Adding an Expense with Invalid Amount
- Prerequisites: None.
- Test Case: add
expense c/Transport a/abc d/Bus Fare - Expected: Error message due to invalid amount format. Command line interface will instruct on correct format.
- 2.2.4 Adding a category that is not listed in the category
- Prerequisites: None.
- Test Case:
add expense c/abc a/50 d/Bus fare - Expected: Error message due to invalid category. Command line interface will instruct on correct format.
2.3 Adding Savings
- 2.3.1 Adding Valid Savings
- Test Case ID: addSaving_validInput_success
- Description: Tests adding a valid saving entry to the SavingList.
- Method:
addSaving(String category, String amount) - Input:
Salary,500 - Expected Outcome: The savings list size should be
1. The category of the saved entry should beSalary. The amount of the saved entry should be500.
- 2.3.2 Adding Saving with Invalid Amount Format
- Test Case ID: addSaving_invalidAmount_exceptionThrown
- Description: Tests adding a saving with a non-numeric amount.
- Method:
addSaving(String category, String amount) - Input:
Salary,abc - Expected Outcome: A BudgetBuddyException is thrown with the message
Invalid amount format. Amount should be a positive number with up to maximum two decimal places.
- 2.3.3 Adding Saving with Negative Amount
- Test Case ID: addSaving_negativeAmount_exceptionThrown
- Description: Tests adding a saving with a negative amount.
- Method:
addSaving(String category, String amount) - Input:
Salary,-1.00 - Expected Outcome: A BudgetBuddyException is thrown with the message
Invalid amount format. Amount should be a positive number with up to maximum two decimal places.
- 2.3.4 Adding Saving with Non-Listed Category
- Test Case ID: addSaving_nullCategory_exceptionThrown
- Description: Tests adding a saving with a category that is not listed in the predefined categories.
- Method:
addSaving(String category, String amount) - Input:
abc,500 - Expected Outcome: A BudgetBuddyException is thrown with the message
The category 'abc' is not listed.
2.4 Add Split Expenses
- 2.4.1 Adding a Valid Split Expense
- Test Case ID: addSplitExpense_addingsplitexpense_success
- Description: Tests adding a valid split expense entry to the
SplitExpenseList. - Method:
addSplitExpense(String amount, String numberOfPeople, String description) - Input:
12,12,Lunch - Expected Outcome: The split expenses list size should be
1. The number of people for the split expense should be12. The description of the split expense should beLunch
- 2.4.2 Adding Split Expense with Invalid Amount Format
- Test Case ID: addSplitExpense_invalidAmount_exceptionThrown
- Description: Tests adding a split expense with a non-numeric amount.
- Method:
addSplitExpense(String amount, String numberOfPeople, String description) - Input:
abc,12,Lunch - Expected Outcome: A BudgetBuddyException is thrown with the message
Invalid amount format. Amount should be a number.
- 2.4.3 Adding Split Expense with Invalid Number of People Format
- Test Case ID: addSplitExpense_invalidNumberOfPeople_exceptionThrown
- Description: Tests adding a split expense with a non-numeric number of people.
- Method:
addSplitExpense(String amount, String numberOfPeople, String description) - Input:
12,abc,Lunch - Expected Outcome: A BudgetBuddyException is thrown with the message
Number of people should be a number.
- 2.4.4 Adding Split Expense with Negative Amount
- Test Case ID: addSplitExpense_negativeAmount_exceptionThrown
- Description: Tests adding a split expense with a negative amount.
- Method:
addSplitExpense(String amount, String numberOfPeople, String description) - Input:
-12,12,Lunch - Expected Outcome: A BudgetBuddyException is thrown with the message
Expenses should not be negative.
- 2.4.5 Adding Split Expense with Negative Number of People
- Test Case ID: addSplitExpense_negativeNumberOfPeople_exceptionThrown
- Description: Tests adding a split expense with a negative number of people.
- Method: addSplitExpense(String amount, String numberOfPeople, String description)
- Input: “12”, “-12”, “Lunch”
- Expected Outcome: A BudgetBuddyException is thrown with the message “Number of people should be a positive number.”
2.5 Edit Savings
Prerequisites : Some savings has been added to the overall savings.
- Test Case :
edit savings c/Salary a/2000Expected : Edits the saving with category “Salary”. If there is no saving with this category, an error message stating invalid category will be printed. - Test Case :
edit savings c/Allowance a/2000Expected : An error message mentioning invalid saving category will be printed. - Test Case :
edit savings c/Salary a/-2000Expected : An error message mentioning invalid amount will be printed.
2.6 Edit Expenses
Prerequisites : Some savings has been added to the overall savings.
- Test Case :
edit expense c/Transport i/2 a/2000 d/GRABExpected : if there is an expense with index 2, it edits the expense at index 2. Else, an error message stating invalid index will be printed. - Test Case :
edit expense c/MRT i/2 a/2 d/workExpected : An error message mentioning invalid saving category will be printed. - Test Case :
edit savings c/Entertainment i/2 a/-2000Expected : An error message mentioning invalid amount will be printed.
2.7 Reducing savings
- Test case:
reduce savings c/Salary a/100Expected: The savings under ‘Salary’ are reduced by $100, and a confirmation message is displayed. Prerequisites : No savings under the category ‘Investments’ exist. - Test case:
reduce savings c/Investments a/100Expected: An error message is displayed indicating no savings found under the category ‘Investments’. Prerequisites : Savings under the category ‘Salary’ exist but are less than $500 - Test case:
reduce savings c/Salary a/500Expected: An error message is displayed indicating insufficient amount in ‘Salary’ to reduce by $500.
2.8 Deleting an expense
- Test case:
delete expense i/1Expected: The first expense in the list, if any, is deleted and a confirmation message is displayed. - Test case:
delete expense i/999Expected: An error message is displayed stating that the index is out of bounds
2.9 Listing Savings
- 2.9.1 Listing Overall Savings
- Prerequisites: There must be existing savings and expenses in the list.
- Test Case:
list savings - Expected: All existing savings will be printed, along with the initial amount and remaining amount after deducting expenses if necessary.
- 2.9.2 Listing Savings by a specific category
- Prerequisites: There must be existing savings of
Salarycategory and expenses in the list. - Test Case:
list savings Salary - Expected: Savings that have the
Salarycategory will be printed, along with the overall remaining savings deducting expenses.
- Prerequisites: There must be existing savings of
2.10 Listing Expenses
- 2.10.1 Listing Overall Expenses
- Prerequisites: There must be existing expenses in the list.
- Test Case:
list expenses - Expected: All existing expenses will be printed, along with the overall amount.
- 2.10.2 Listing Expenses by a specific category
- Prerequisites: there must be existing expenses of
Transportcategory in the list. - Test Case:
list expenses Transport - Expected: Expenses relating to the
Transportcategory will be printed, along with the overall amount.
- Prerequisites: there must be existing expenses of
2.11 Finding an expense
Prerequisites : Some expenses has been added to the overall expense.
- Test Case :
find expenses d/cat morethan/ lessthan/
Expected : If there are expenses matching/containing “cat”, the found expenses are printed. Else, message stating no matching expenses found is printed in command line interface - Test Case :
find expenses d/cat morethan/20 lessthan/
Expected : If there are expenses matching/containing “cat” and is more than 20, the found expenses are printed. Else, message stating no matching expenses found is printed in command line interface - Test Case :
find expenses d/cat morethan/string lessthan
Expected : An error message is printed in the command line interface
2.12 Creating a new list of recurring expenses
- Test Case :
rec newlist streaming
Expected : A new list created calledstreaming - Test Case :
rec newlist
Expected : An error message will be printed in the command line interface - Test Case :
rec newlist |
Expected : An error message will be printed in the command line interface
2.13 Listing all lists of recurring expenses
- Test Case :
rec viewlists, with already added lists
Expected : All lists of recurring expenses will be printed in the command line interface - Test Case :
rec viewlists, with no added lists
Expected : Message stated there being no recurring expenses is printed in the command line interface - Test Case :
rec viewlists extra
Expected :viewlistsshould still work as intended, with no exceptions being thrown
2.14 Removing a list of recurring expenses
- Test Case :
rec removelist 1, with a list being present at the list number1duringrec viewlists
Expected : List located at list number 1 will be removed, and a success message is printed in the command line interface - Test Case :
rec removelist string
Expected : Error message will be printed in the command line interface, along with the proper command format - Test Case :
rec removelist -1
Expected : Error message will be printed in the command line interface - Test Case :
rec removelist
Expected : Error message will be printed in the command line interface
2.15 Adding an expense into a list of recurring expenses
- Test Case :
rec newexpense to/1 c/Entertainment a/200 d/description, with a list being present at list number1
Expected : Expense with details Entertainment, 200, description will be added to list at list number1 - Test Case :
rec newexpense to/1
Expected : Error message will be printed in the command line interface - Test Case :
rec newexpense to/string c/Entertainment a/200 d/description
Expected : Error message will be printed in the command line interface
2.16 Viewing all expenses in a list of recurring expenses
- Test Case :
rec viewexpenses 1, with a list being present at list number1and contains expenses inside
Expected : Prints all expenses present in the recurring expense list 1 - Test Case :
rec viewexpenses 1with a list not being present
Expected : Error message will be printed in the command line interface - Test Case :
rec viewexpenses 1with a list being present at list number1, but does not contain any expenses inside
Expected : Prints an empty set of expenses to command line interface, with expenses at $0
2.17 Adding all expenses in a list of recurring expenses to the overall expenses
- Test Case :
rec addrec 1, with a list being present at list number1and contains expense inside
Expected : Adds all expenses present in recurring expense list 1 to the overall expenses - Test Case :
rec addrec 1, with a list being present a list number1but does not contain any expenses inside
Expected : A message is provided in the command line interface informing the user that nothing has been added - Test Case :
rec addrec 1, with a list not being present at list number1
Expected : Error message will be printed in the command line interface
2.18 Loading recurring expenses
Prerequisite : The RecurringExpensesFile.txt should be empty prior to each Test Case
- Test Case : Add a line in
RecurringExpensesFile.txtcalled!!! newlist !!!Expected : A recurring expense list namednewlistwill be present when doing arec viewlists - Test Case : Add an invalid line in
RecurringExpensesFile.txtcalled!!! new!!!list !!!
Expected : Error is printed in the CLI, RecurringExpensesFile will be reset to an empty file - Test Case : Add a line in
RecurringExpensesFile.txtcalled!!! newlist !!!and another line below it1 | 2024-04-13 | Entertainment | 203.35 | movies
Expected : A recurring expense list namednewlistwill be present at list number 1 when doing arec viewlistsand an expense with the above description is present when doing arec viewexpenses 1
2.19 Saving recurring expenses
- Test Case :
rec newlist streaming servicesfollowed by abye
Expected : TheRecurringExpensesFile.txtshould now contain a!!! streaming services !!!. The list will also still be present after Relaunching application. - Test Case :
rec newlist streaming servicesfollowed by arec newexpense to/1 c/Entertainment a/200 d/description, followed by abye
Expected : The recurring liststreaming serviceswhich contains an expense with the description above will still be present after relaunching the application
2.20 Changing Currency
- 2.20.1 Changing Currency
- Prerequisite: There must be existing savings and expenses in the list.
- Test Case:
change currency USD - Expected: All existing savings and expenses will be converted to the USD equivalent pricing.
- 2.20.2 Changing Default Currency
- Prerequisite: There need not be existing savings or expenses in the list.
- Test Case:
change currency USD - Expected: Default Currency would be changed to USD. Future amounts added will be in USD.
2.21 Setting budget
- Test case:
set budget c/Groceries b/200Expected: A budget of $200 is set for ‘Groceries’, and a confirmation message is displayed. - Test case:
set budget c/Transport b/-50Expected: An error message is displayed indicating the budget cannot be negative. Prerequisites : A budget for ‘Transport’ exists. - Test case:
set budget c/Transport b/300Expected: The budget for ‘Transport’ is updated to $300, and a message confirming the update is displayed.
2.22 List Budget
Prerequisites : Budgets must be set for multiple categories.
- Test case:
print budgetExpected: All existing budgets are listed with their respective categories and amounts. Prerequisites : No Budgets are set - Test case:
print budgetExpected: A message is displayed indicating no budgets have been set.
2.23 Get Graphical Insights for Expenses
- Prerequisites: There must be existing expenses in the list.
- Test Case:
get expenses insights - Expected: Bar graph will be printed for each category.
2.24 Get Graphical Insights for Savings
- Prerequisites: There must be existing savings in the list.
- Test Case:
get savings insights - Expected: Bar graph will be printed for each category.